taking chisel to daggerboard slots

Cleaning Out our Daggerboard Slots

open daggerboard slot

Did you know that our boat came with daggerboards?  Originally, that is.  We don’t have them anymore which is unfortunate, because these two stabalizing boards that once came down the aft end of our boat would have made downwind passages so much more comfortable.  No rocking back and forth in the waves, but instead riding them like it was on rails.

The daggerboards are meant to be used both upwind and downwnd.  When sailing upwind you would lower the centerboard and lower the leeward daggerboard to help keep the boat on it’s intended course.  Once you’re running downwind you raise the centerboard to bring the control aft and help prevent broaching.  With the centerboard in the upright position you lower both daggerboards to give stability and help the boat steer straight.  Something that would have been nice to be able to do, but now we can’t.

Trisalu plans

Trisalu 37 with daggerboards

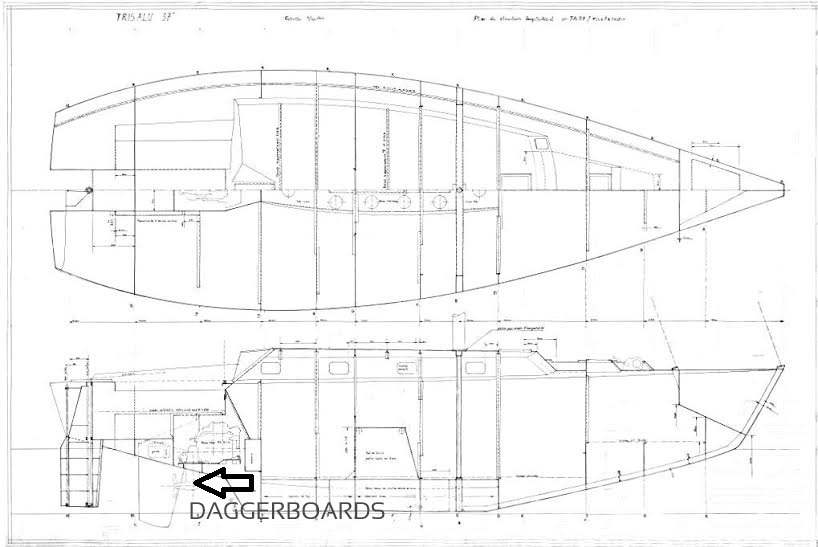
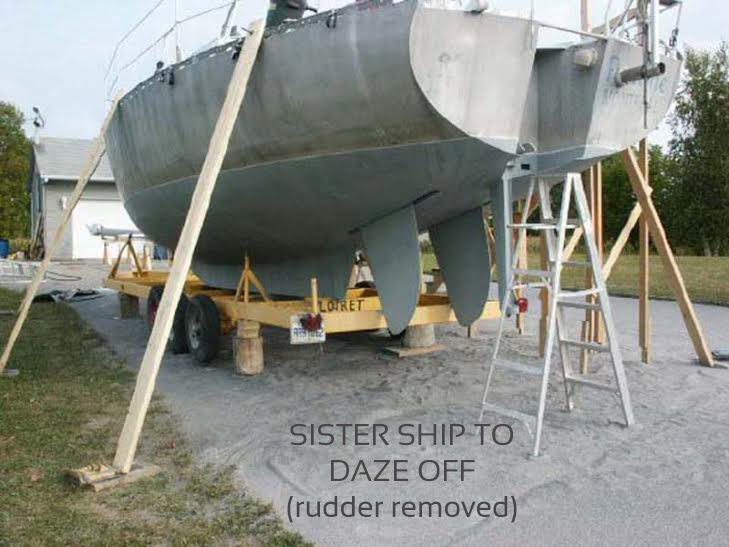
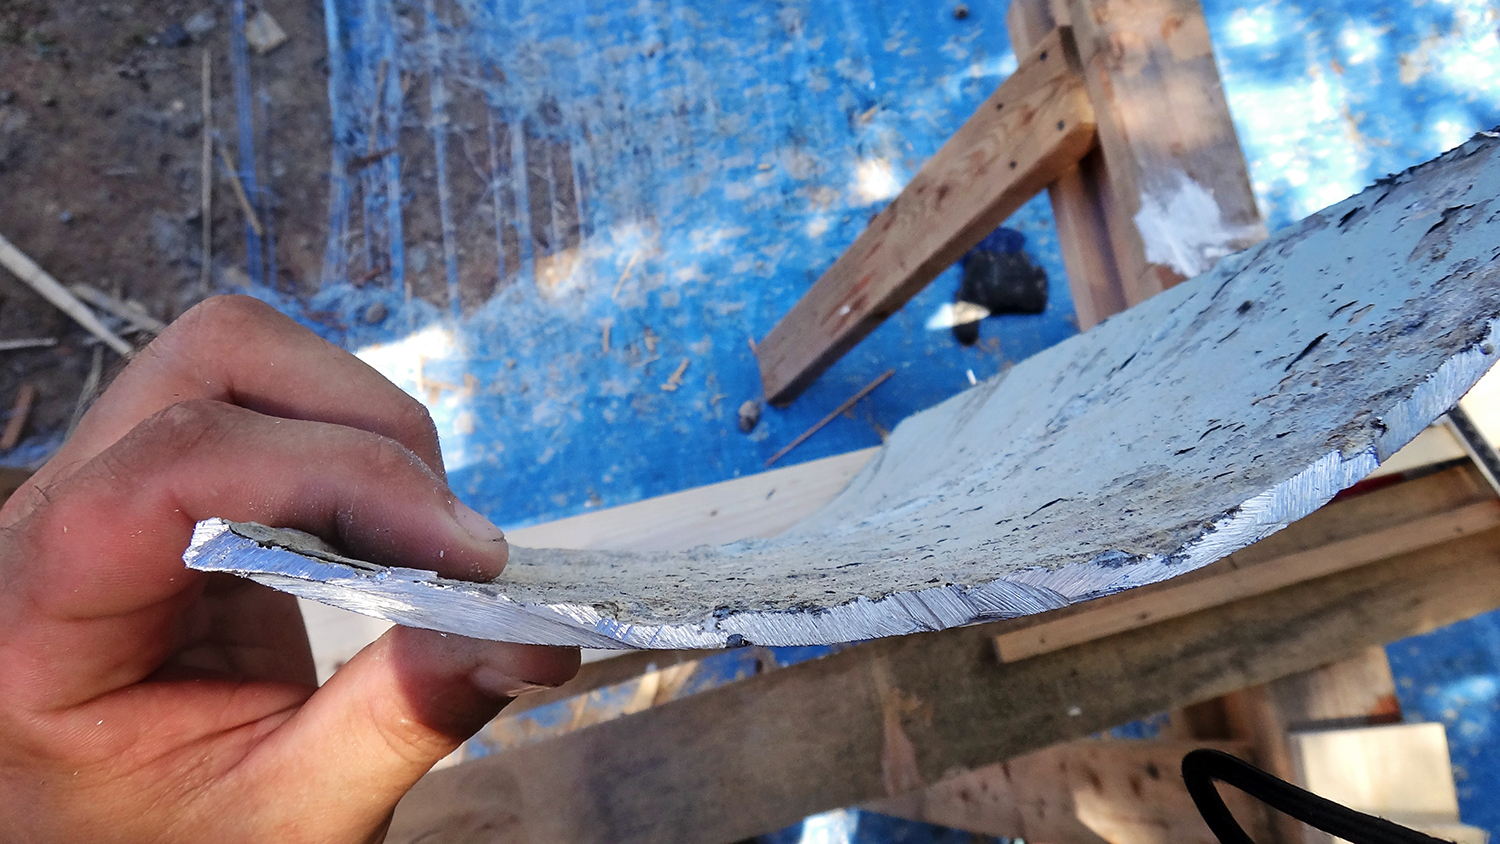
We don’t know the history of what happened to the original boards which were in place, but we do know this.  Most of the time, daggerboards are built of plywood and fiberglass.  This is because they hang lower in the water than the keel and are more likely to come into contact with something in the water.  In case this does happen you want them to be able to break cleanly away from the boat so there is no further or long term damage.  We’re assuming this is what happened sometime in the history of Daze Off.

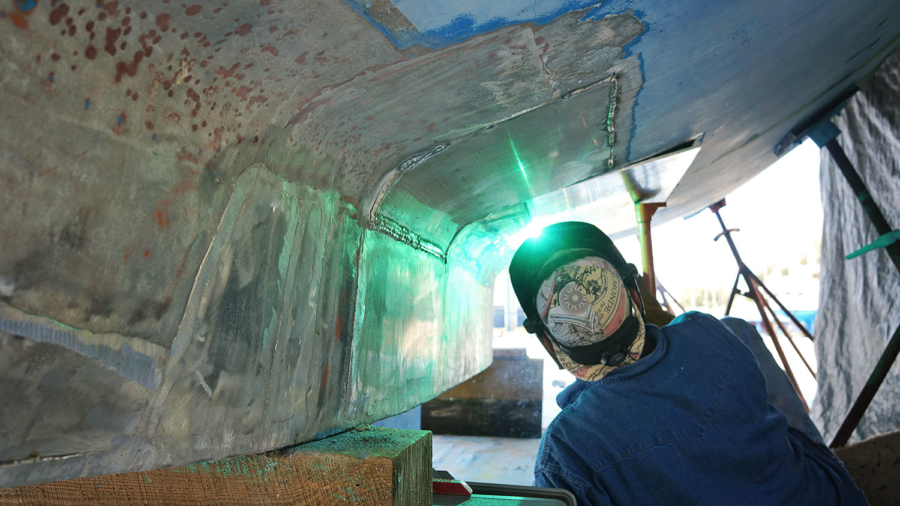
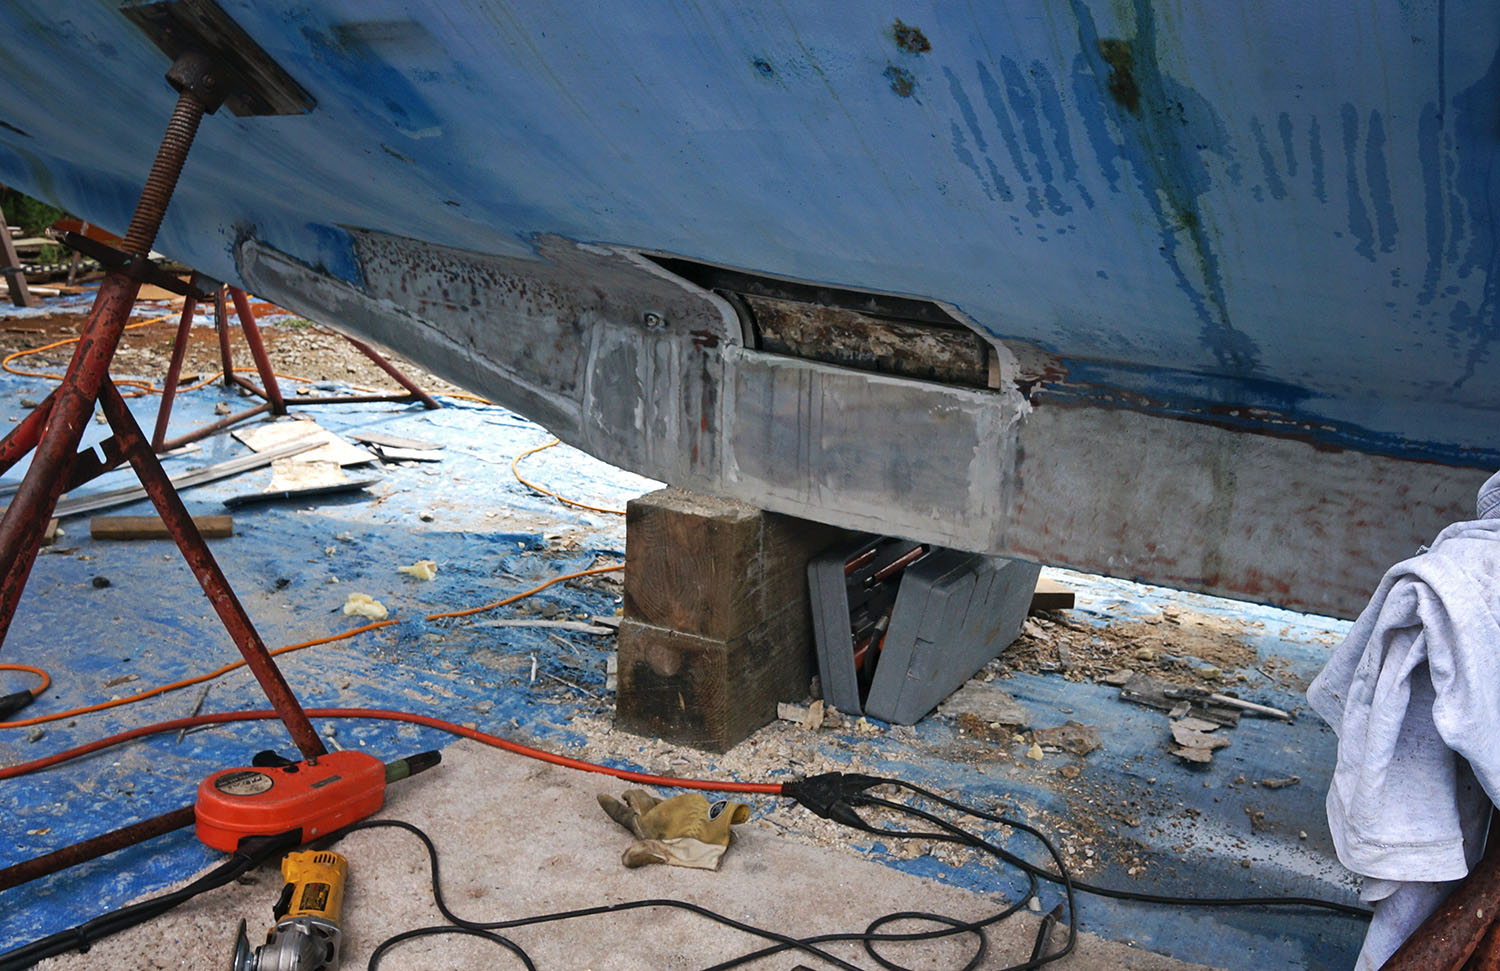
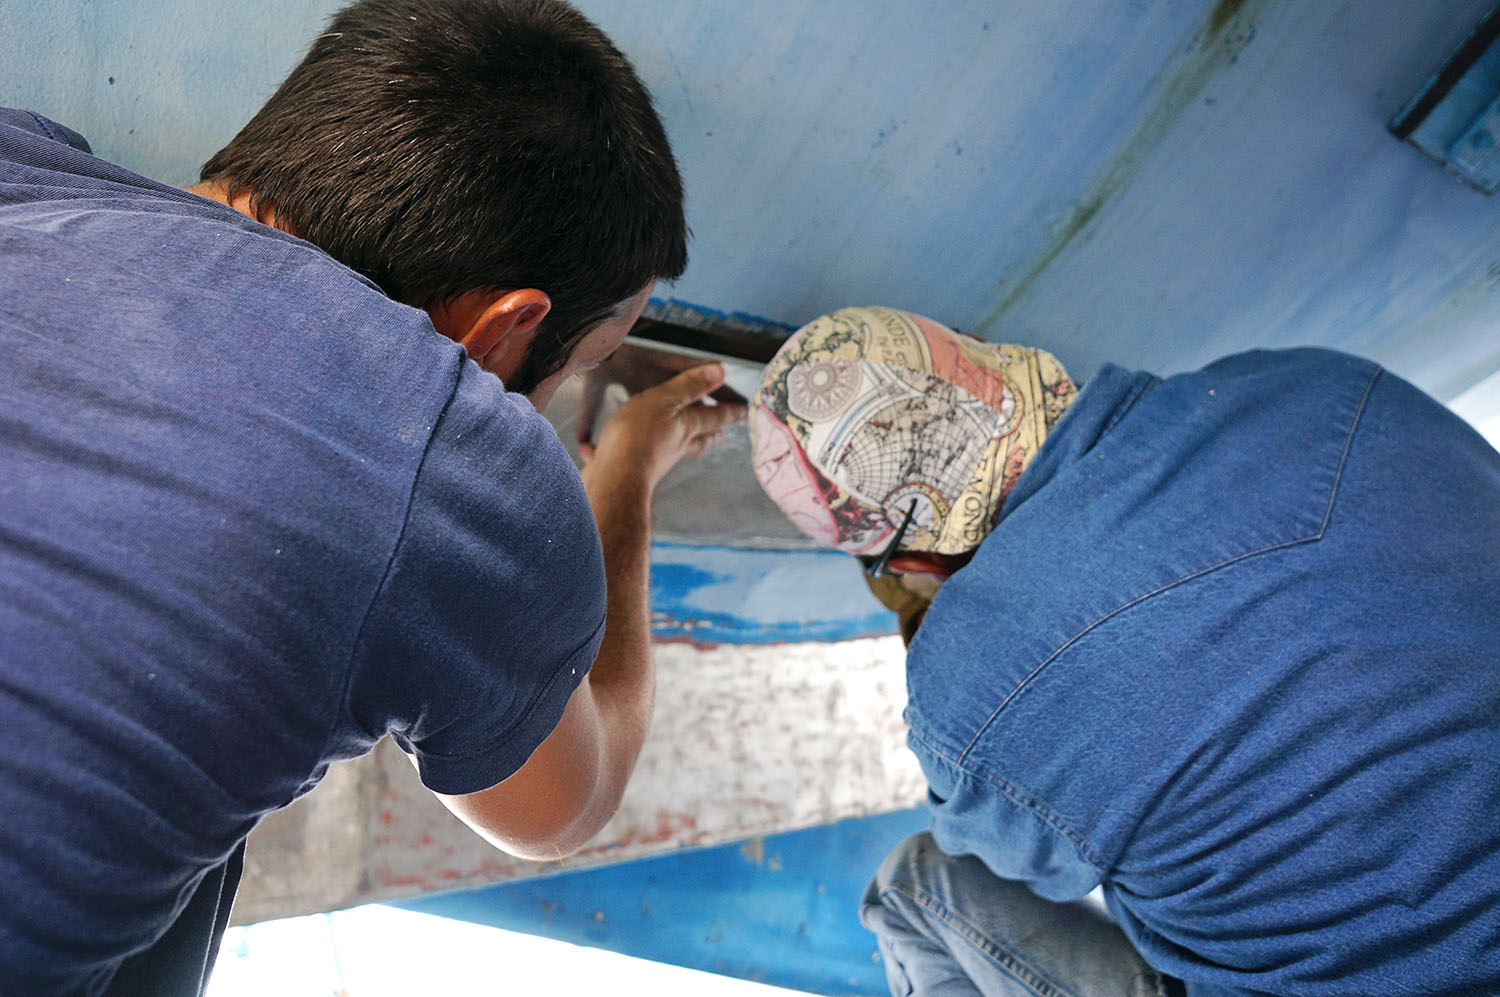
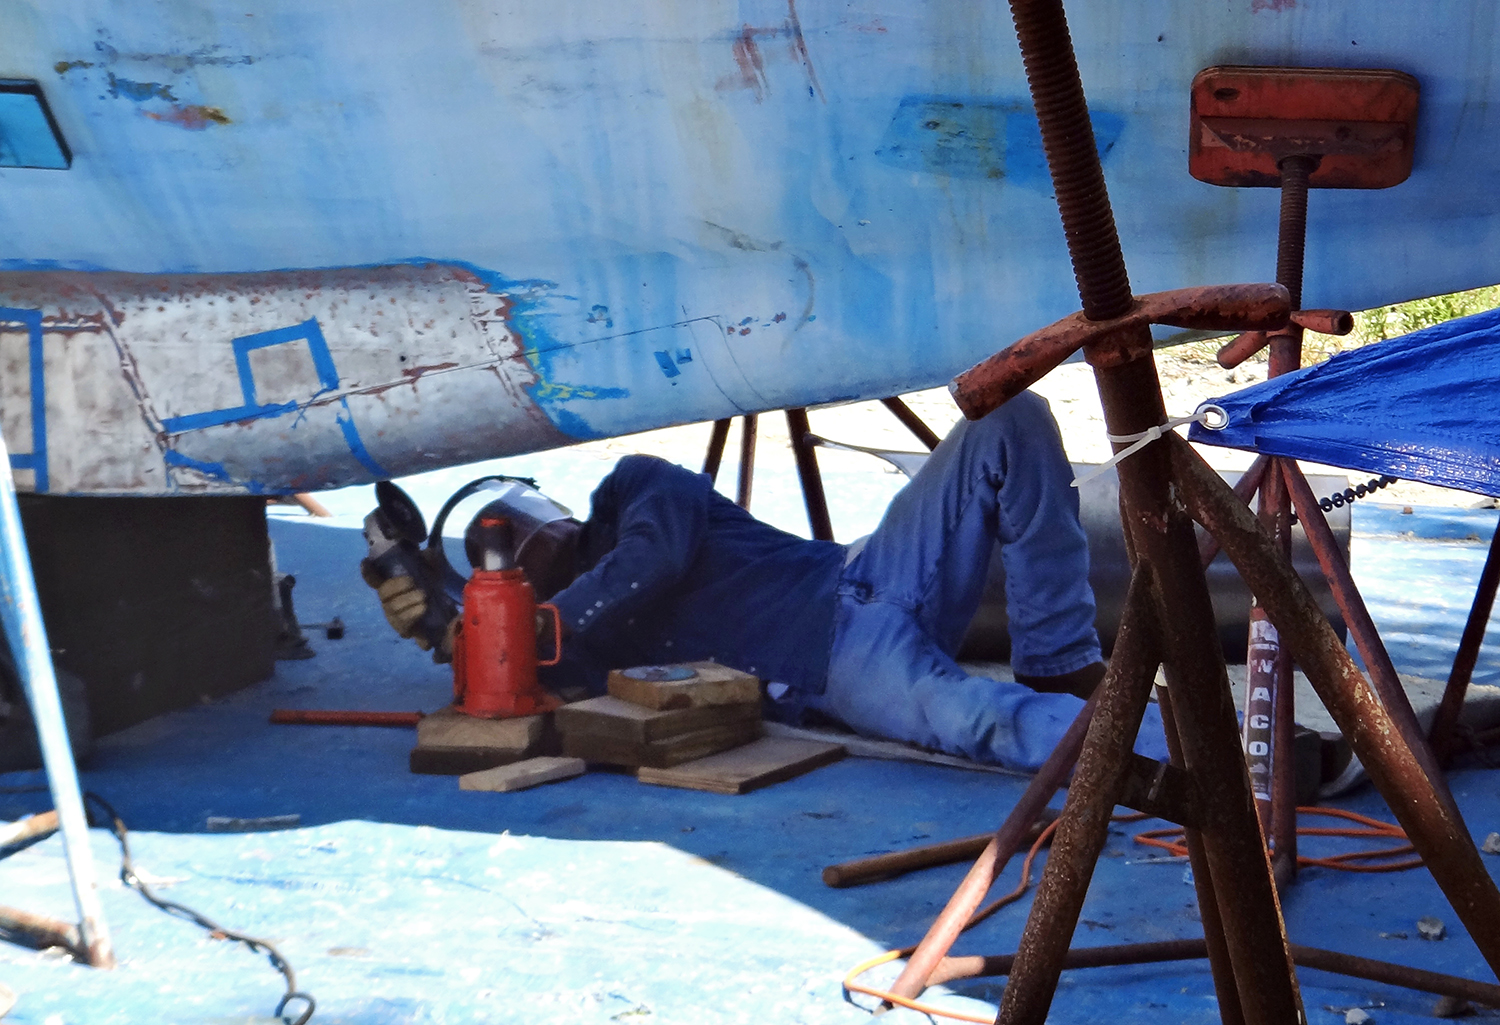
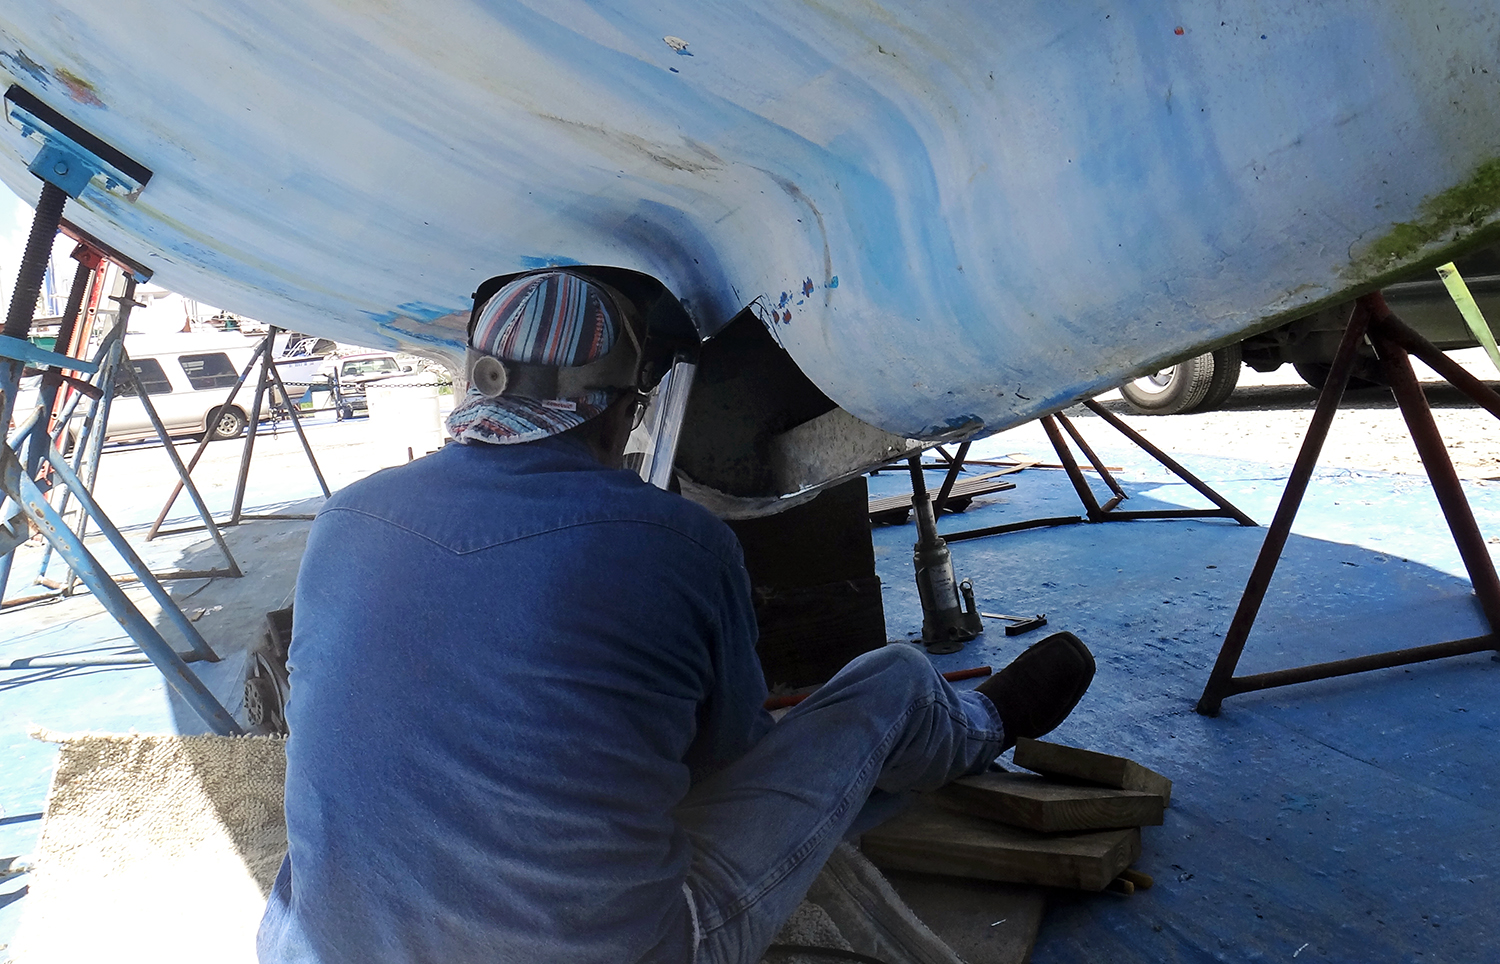
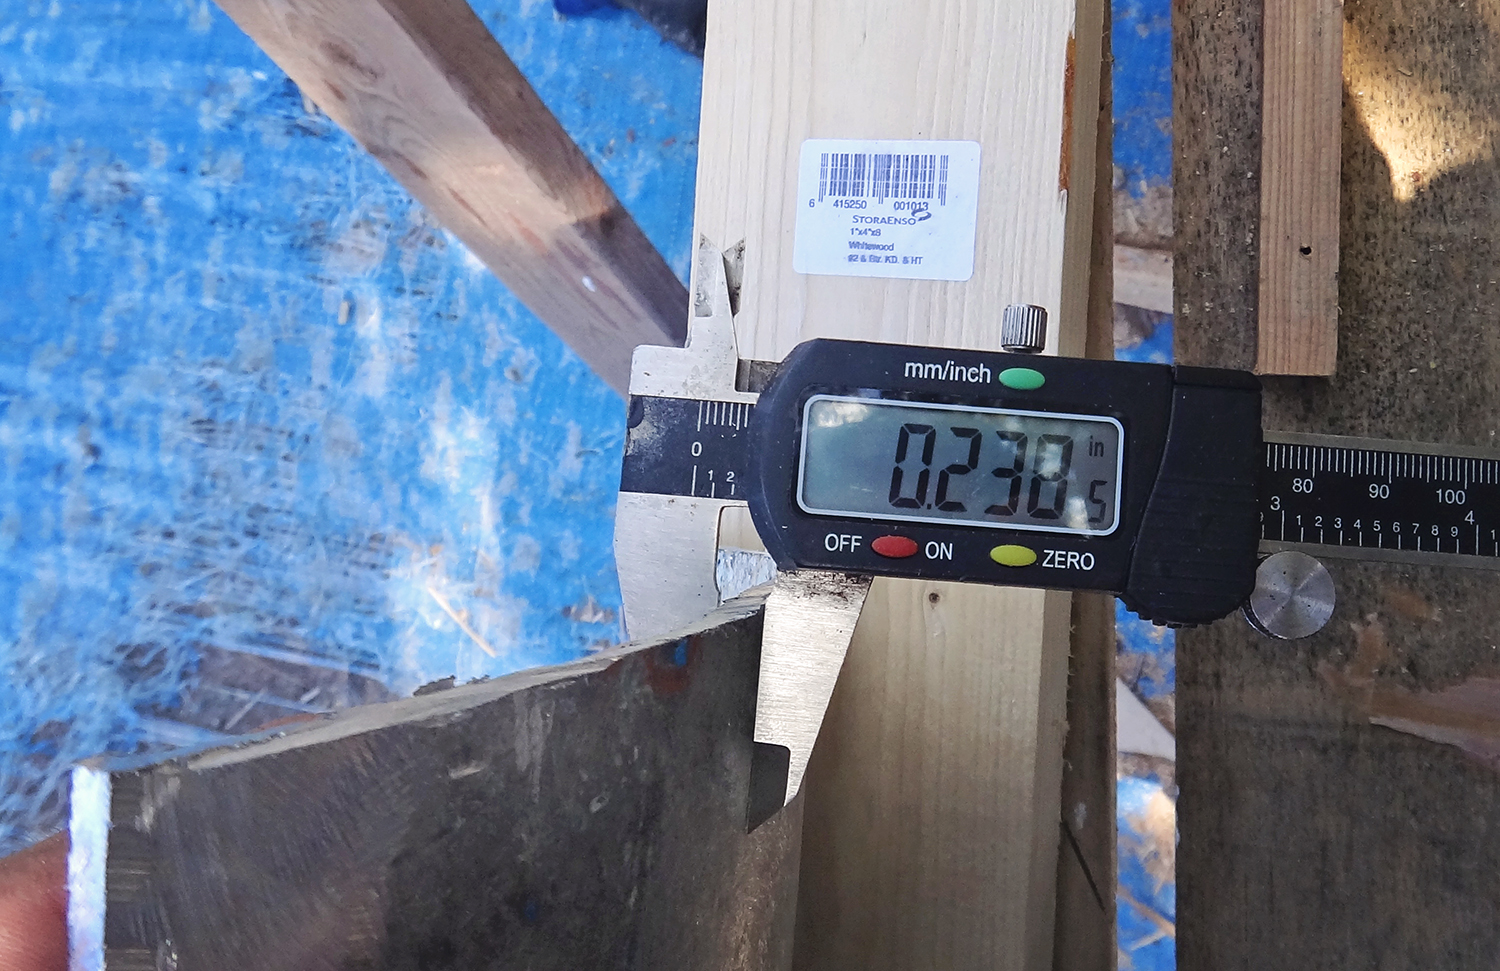
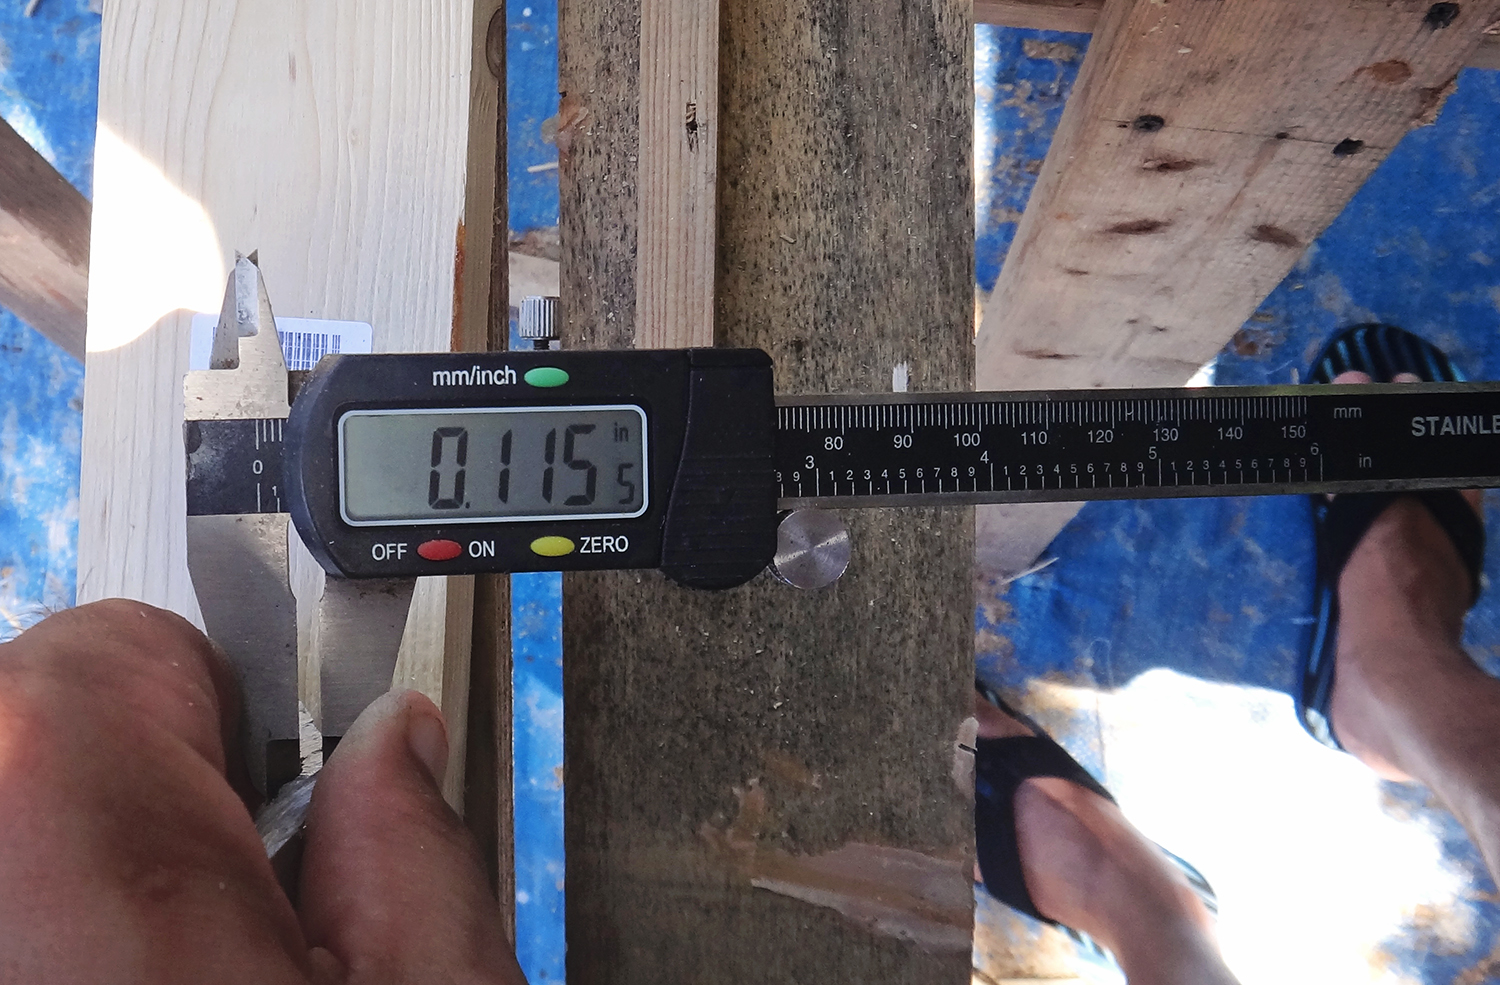
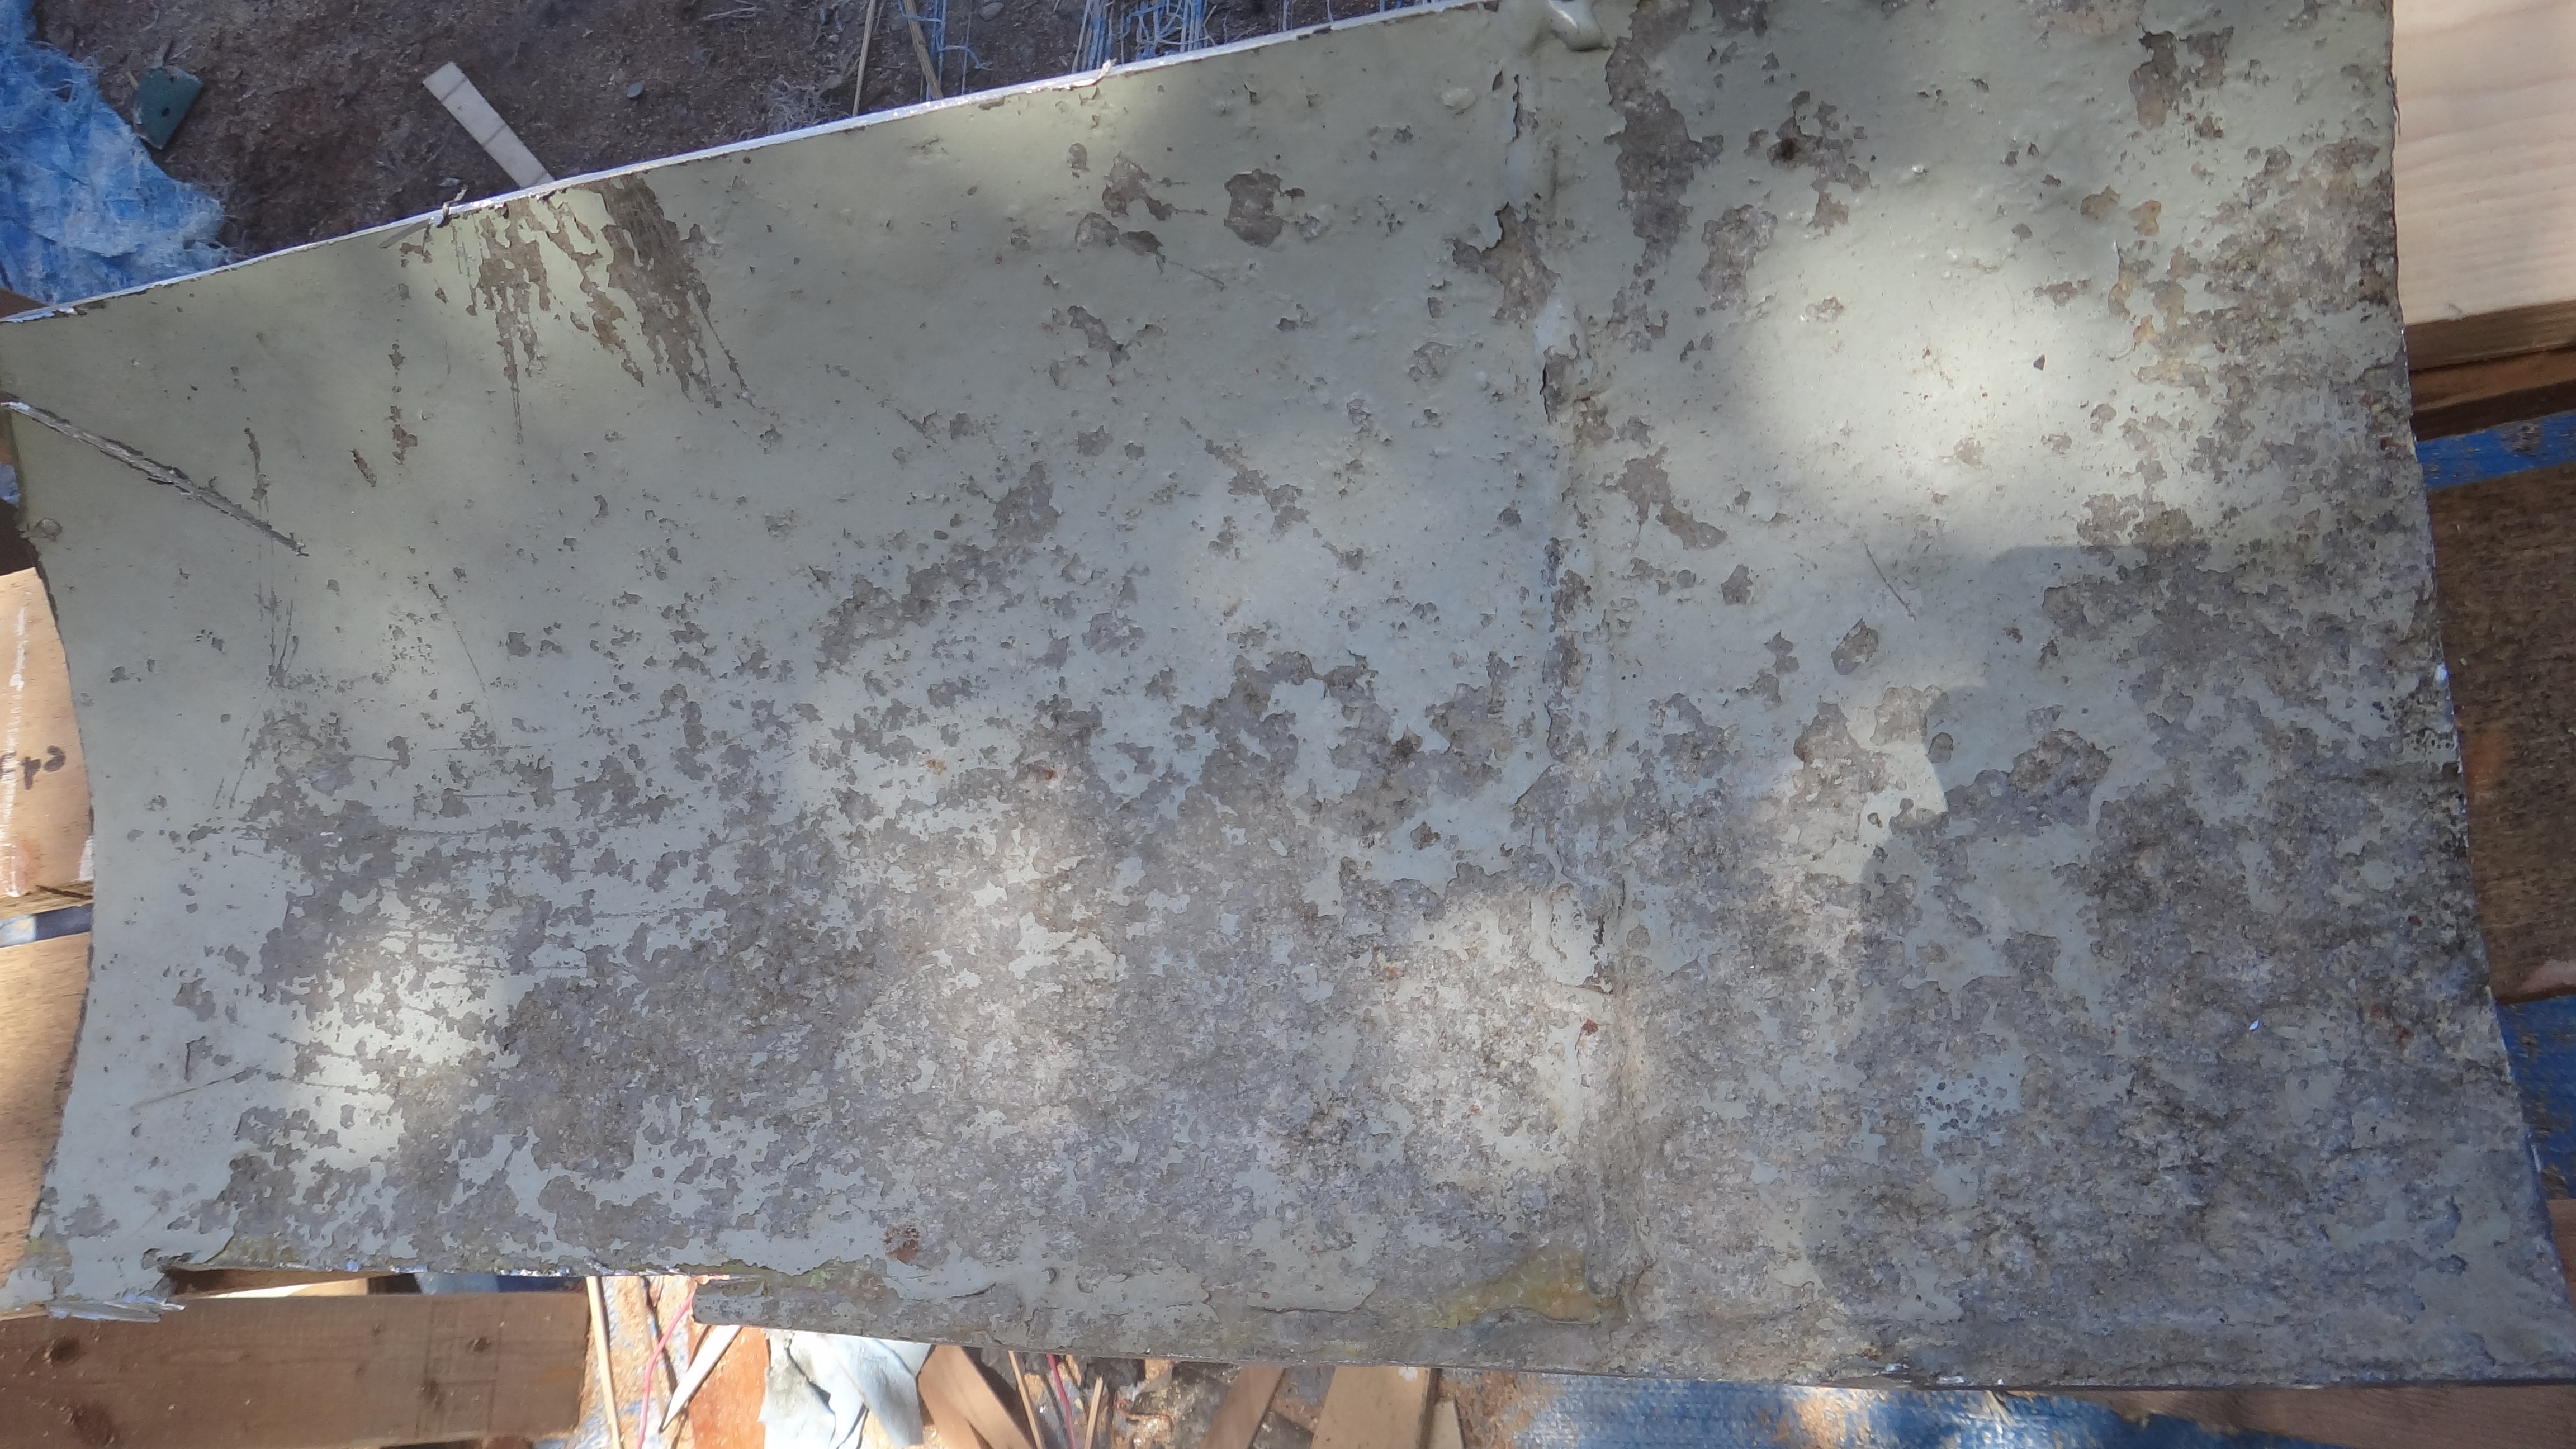
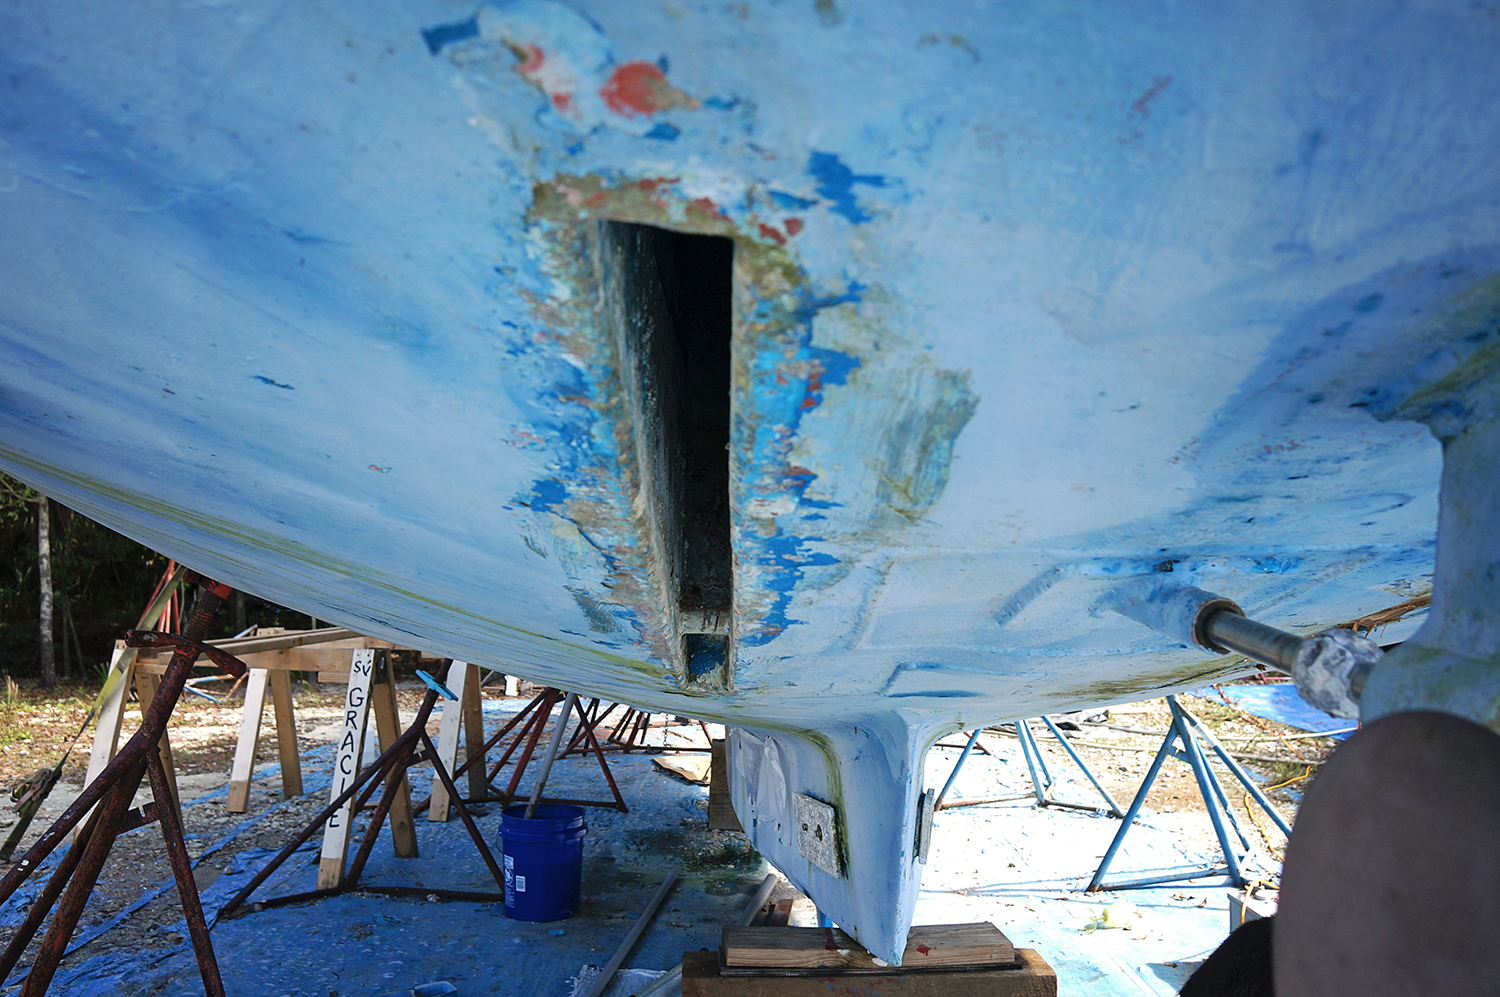
What we do know is that at some point, for some reason or another, they were removed from the boat and the owner at the time took pieces of teak, approximately 4″x4″, coated over them with epoxy, and called it good.  We also know that this was not a secure fix and eventually water leaked into the area.  The wet wood against the aluminum helped to cause corrosion in the area.  Because there is no way to get inside this slim area that runs 4″ by 5′, our only real option is to bring our welder back to properly seal over this area.

I shouldn’t say it would be impossible to do, but much more work that it’s worth, even though we would love to have them for our travels. The back area is a waterproof bulkhead separating the lazarette.  If we did want to put all the effort into properly welding the area to be able to put new daggerboards in we’d have to cut open the cockpit, remove engine, and go through a number of extra steps that are unfortunately not worth our time and energy.

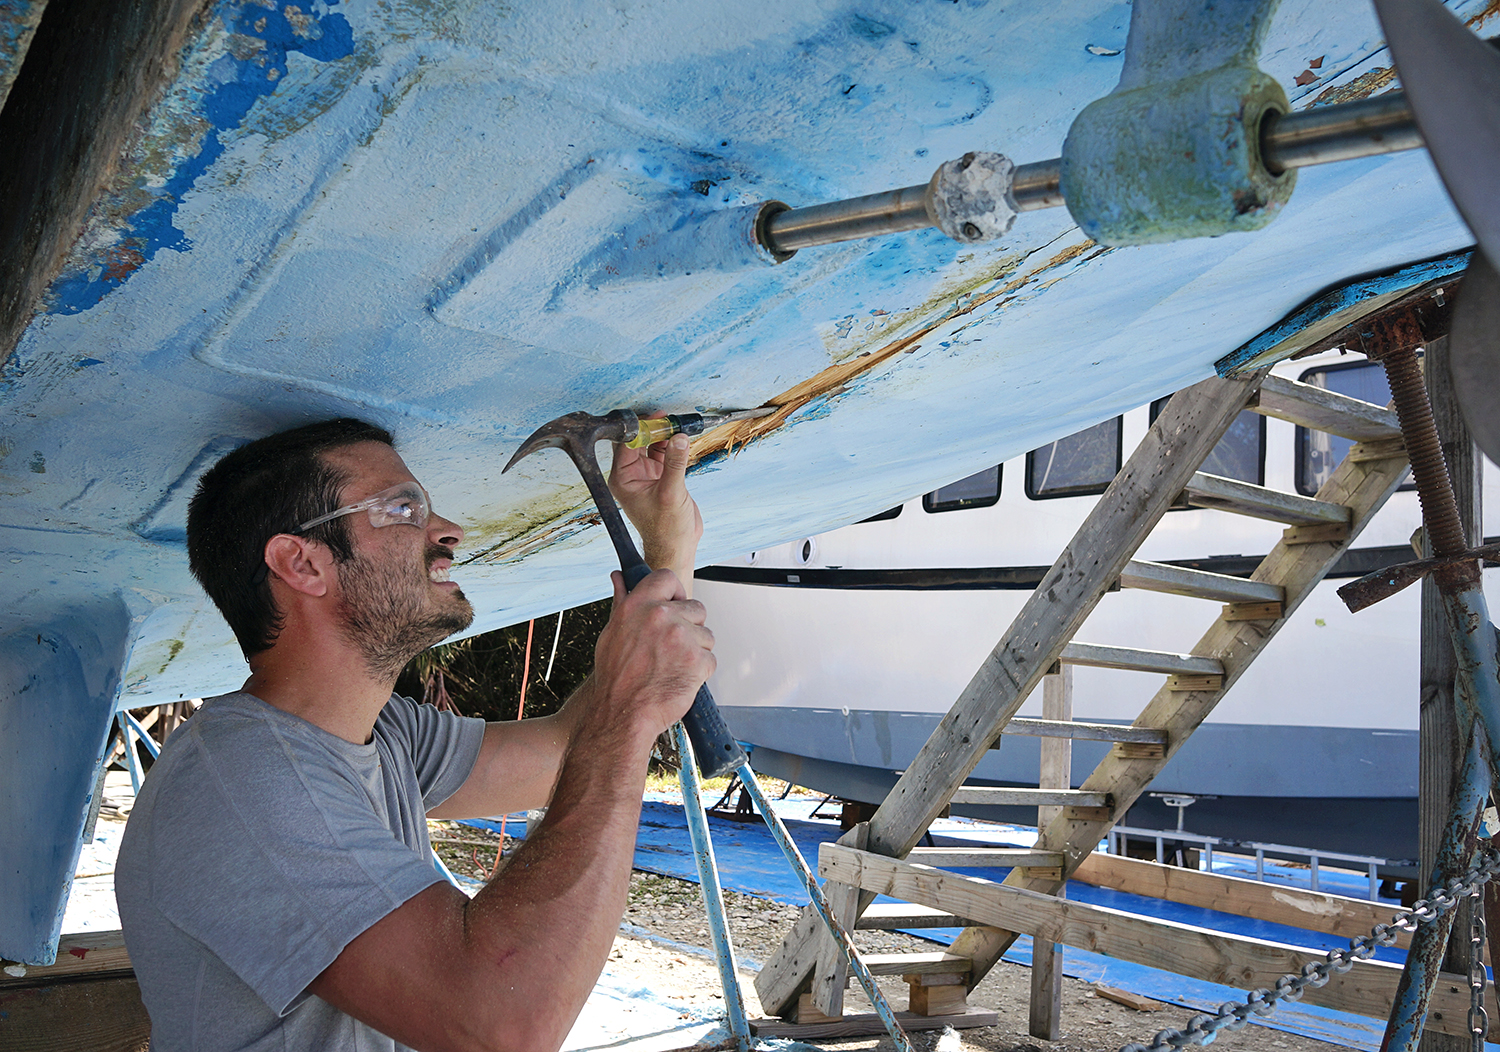
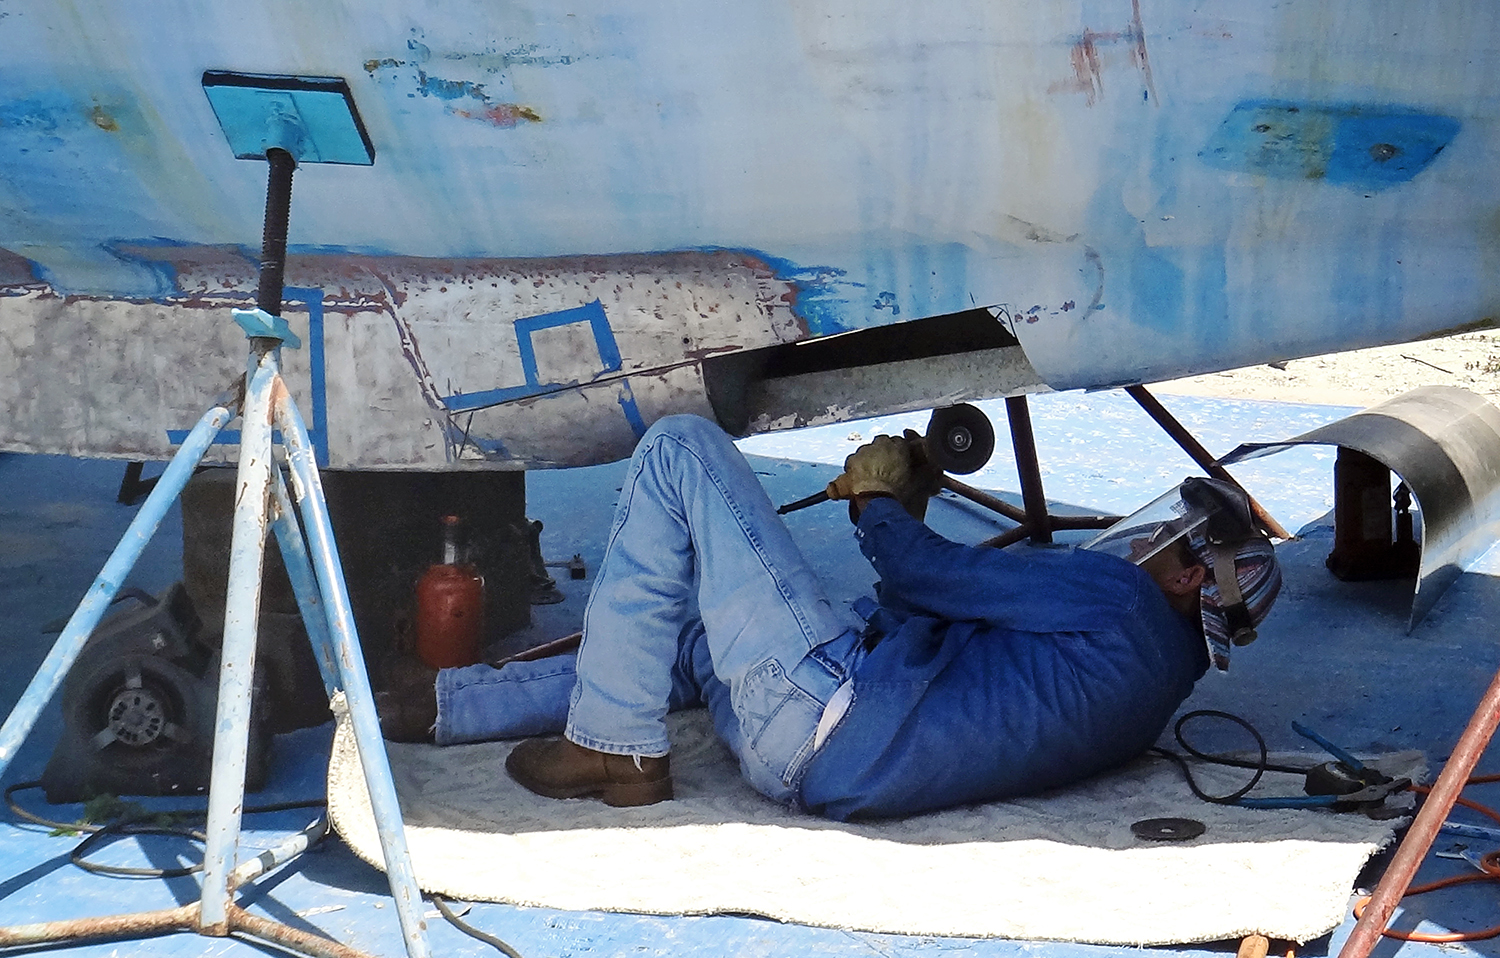
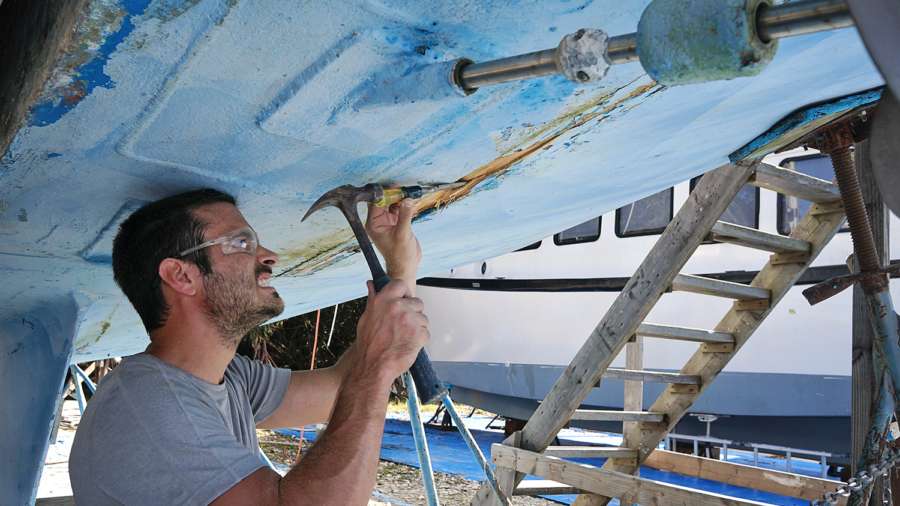
Before we can have our welder come out to close the area off, Matt had the unfortunate task of trying to remove the teak and clean the area out.  Much easier said than done as those boards were shoved up there something fierce, and we’ve been using everything we had in our arsenal to get them out.  First it was small things like a hammer and chisel, or a hammer and our pry bar, but those barely put a dent in to teak.  Eventually we were able to track someone down in the yard that had a reciprocating saw, which allowed Matt to get the depth he needed in there to really break the wood up.  Once he had that, everything began to cleanly fall out.

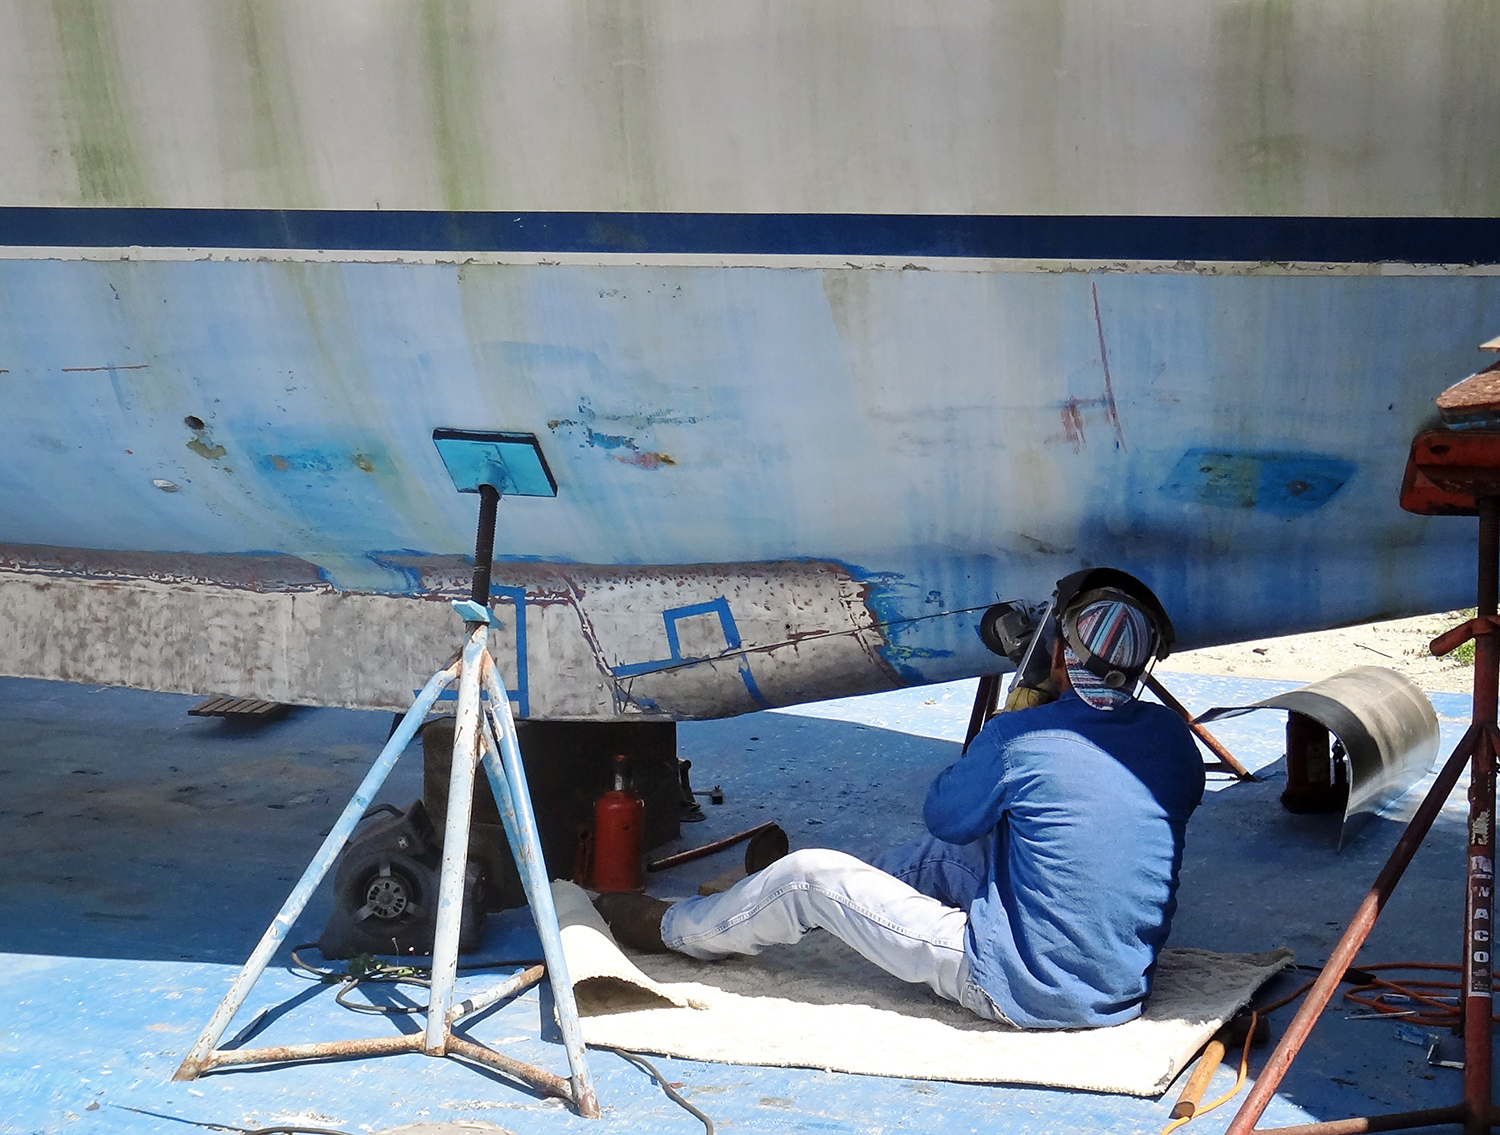
We’ve just given the area a power wash and it should be good to go for our welder the next time we get him out here. To clean this boat at sea after fishing, you’ll need a salt water washdown pump to make the job easier. One more project knocked out!

Matt scraping daggerboard slots

daggerboard slot

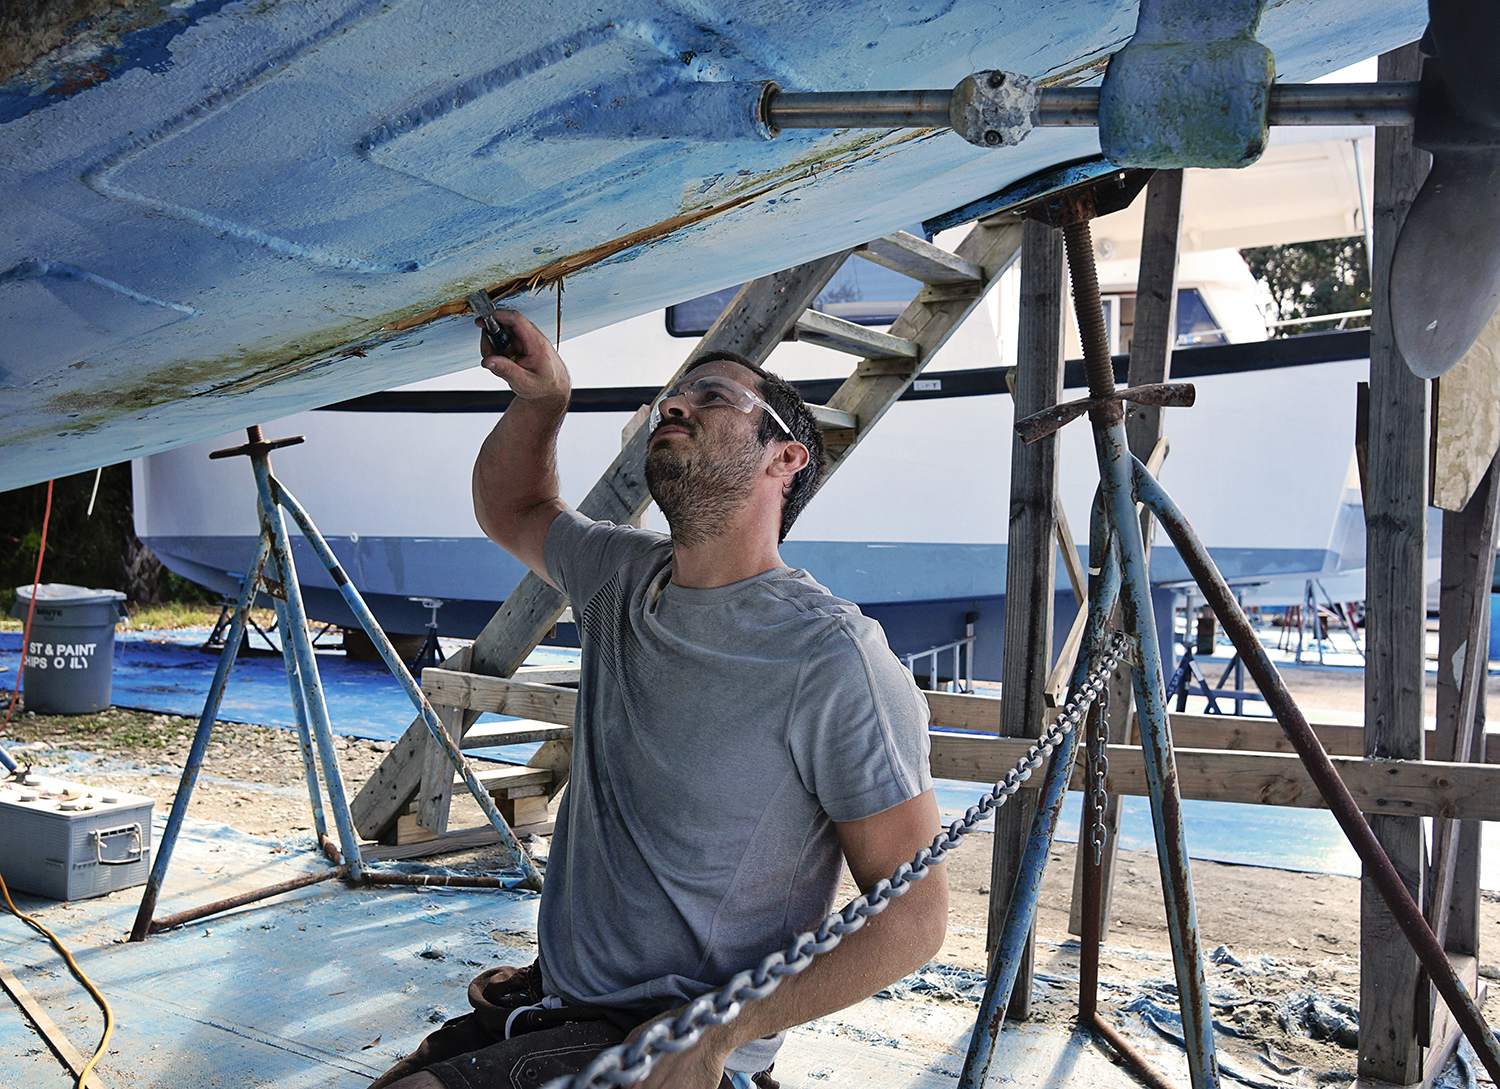
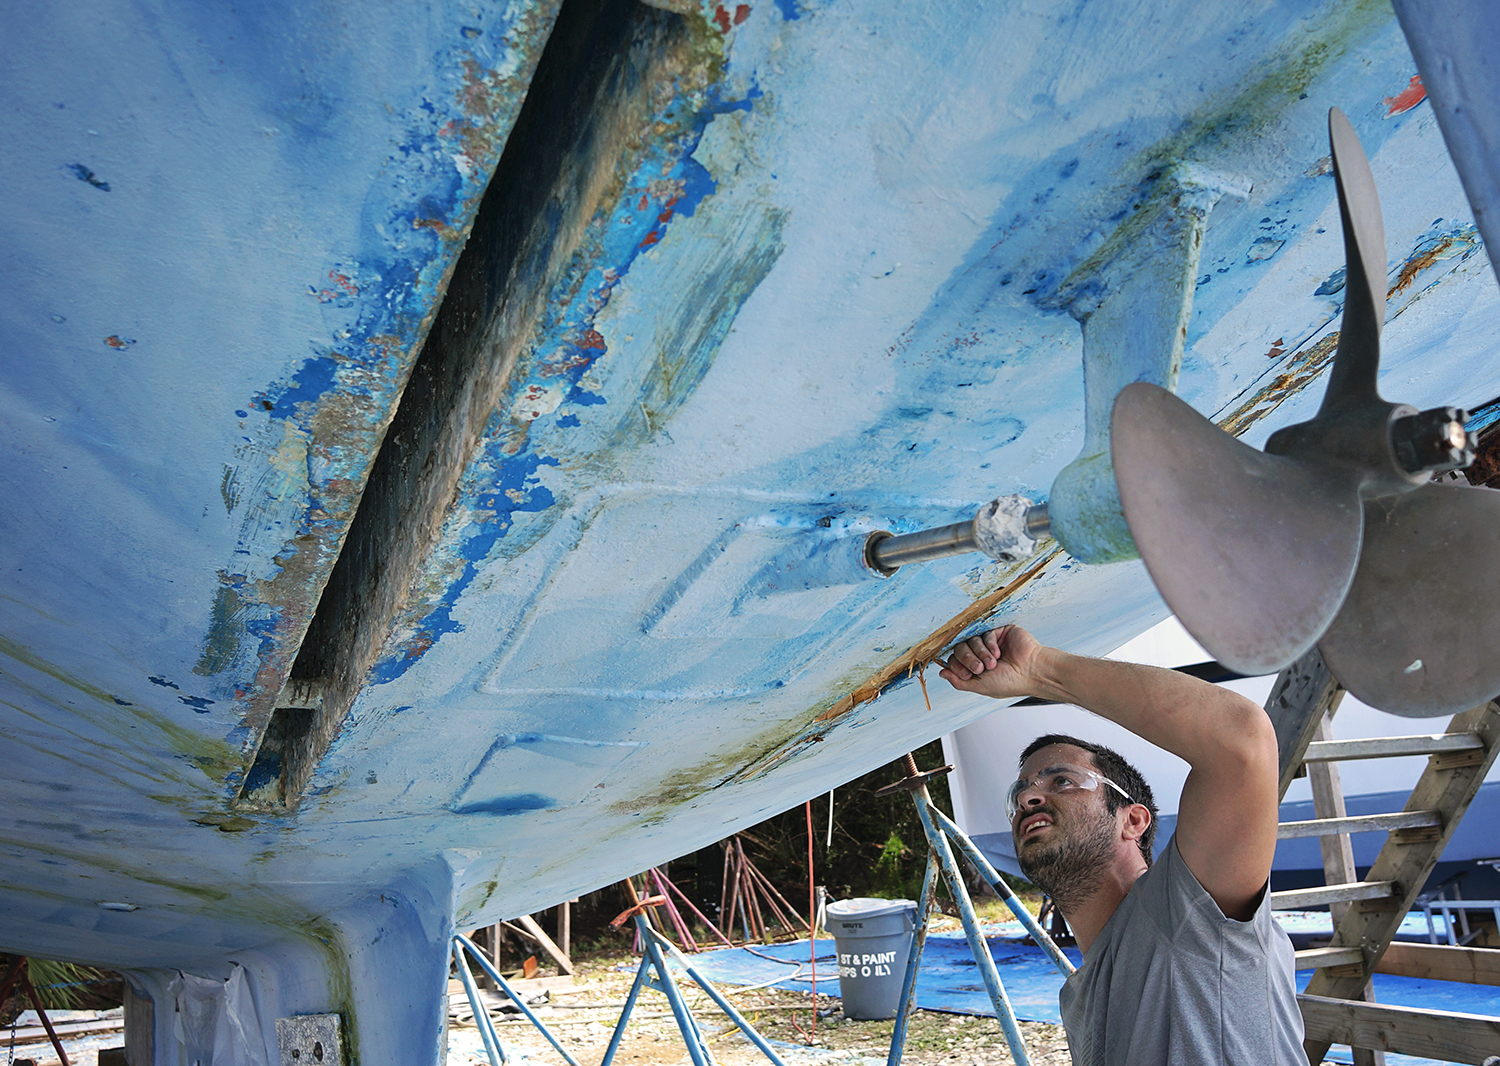
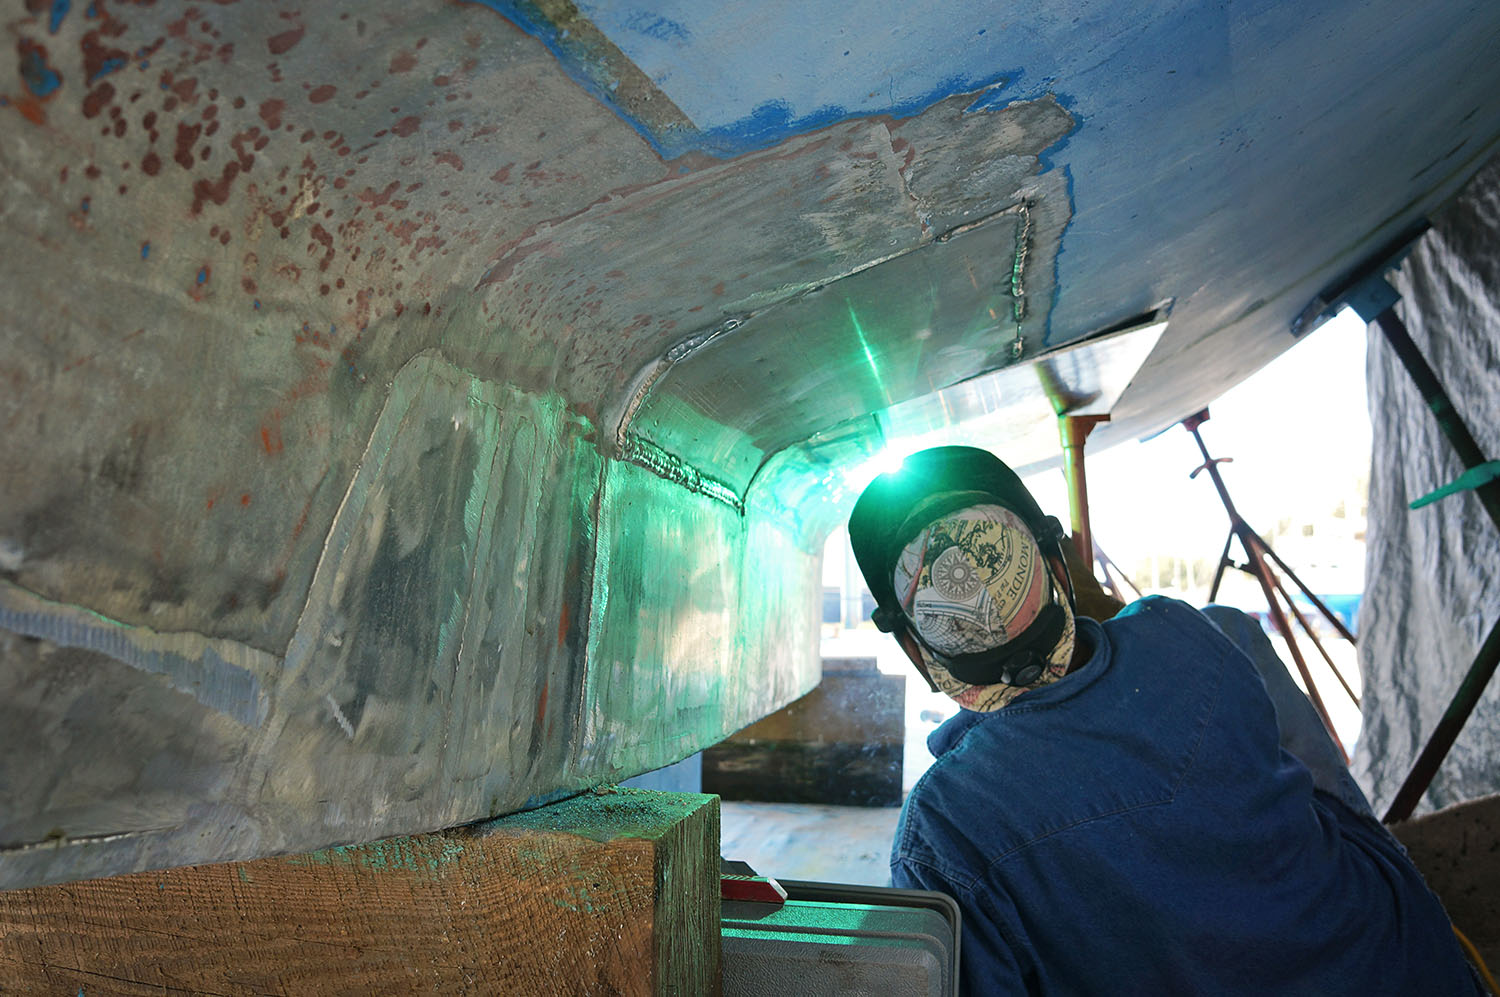
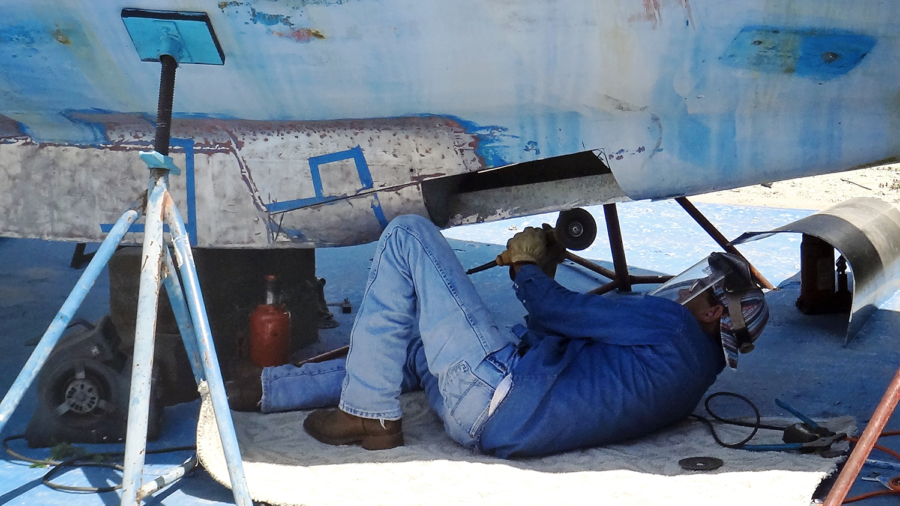
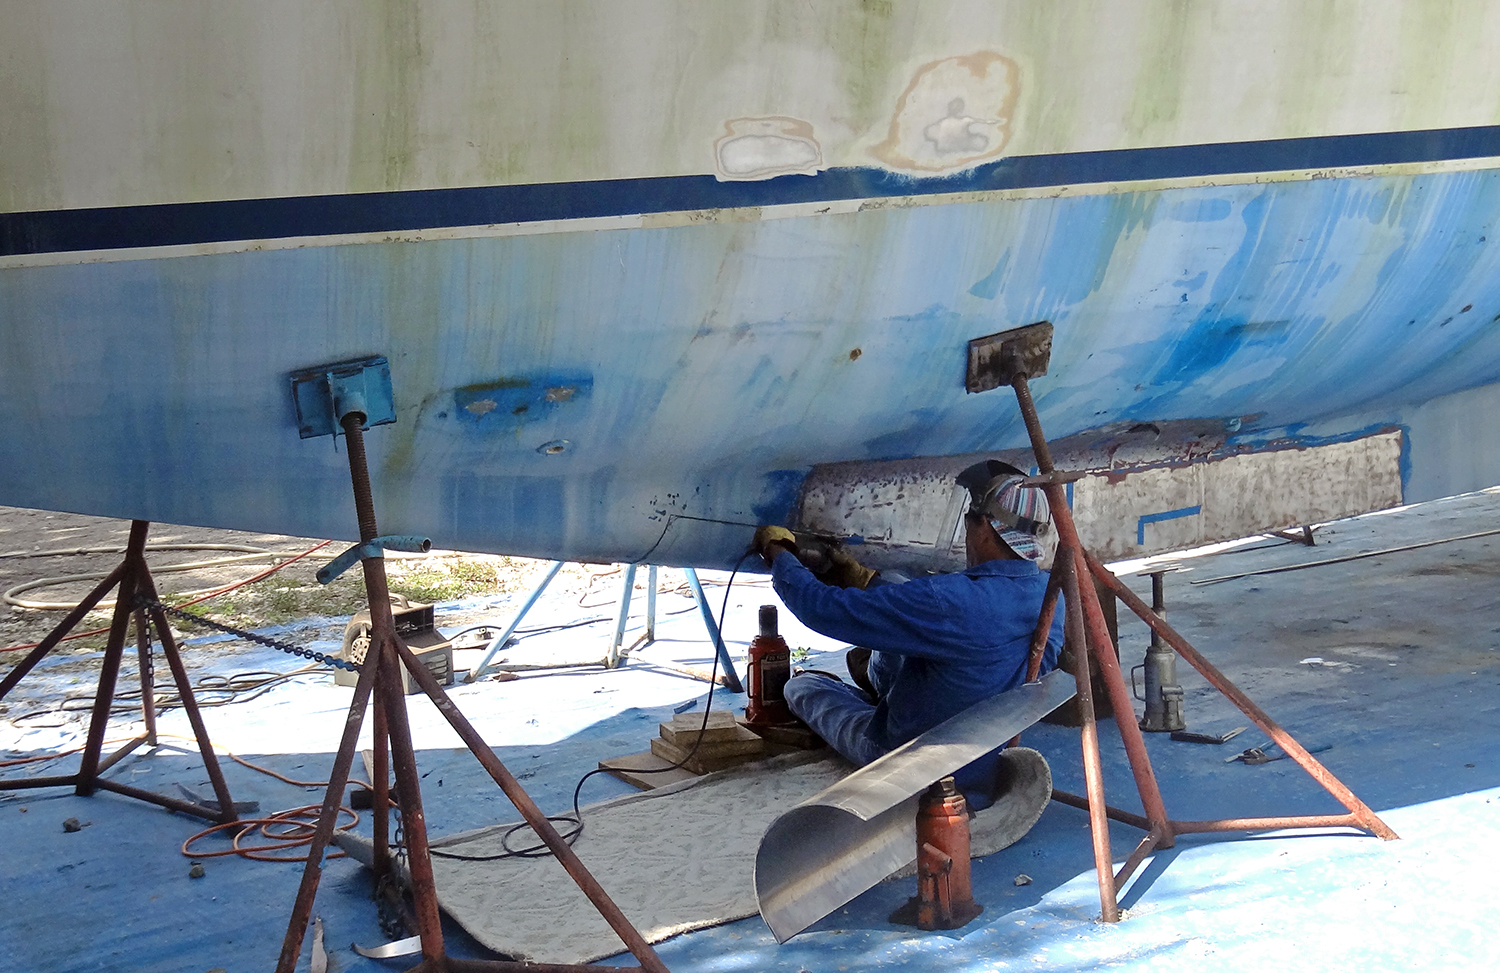
Welded patches above are from the boat’s original Saildrive, which was removed and replaced with a normal prop shaft when the boat was re-powered with a Yanmar engine.

taking chisel to daggerboard slots

cleaning with reciprocating saw

welding new aluminum panel

Stage 2 of Welding our Aluminum Boat

Wednesday September 23, 2015

DSC01330

It’s finished, it’s finally finished!!  The main areas of welding to the floor areas of the head and the galley are now complete.  Aside from a few humps in the beginning where it took a little time to properly shape the new panel on the front of the keel that wrapped around both sides; and having a hard time removing some of the corroded aluminum from the side of the keel because of the lead in our keel directly behind it (an issue that was quickly fixed with the help of an air chisel), things have been moving swiftly along the past few weeks.

Since I can’t comment much more on the welding job because I’m trying to figure out Why is Sheet Metal Thickness Measured In Gauge and Not Inches?  as answering some questions we’ve been getting on this process.

One popular question we get is ‘Why don’t you take a few classes and do this yourself instead of paying someone an hourly rate to do it for you?’. The simple answer is because of the location of the welding.  As Matt likes to tell the people in the work yard who ask us this question, If it were all areas above the waterline or on the deck that required welding, sure we’d probably take the courses and learn to do it ourselves.  It would probably be a handy still to have.  But because all of the areas we are concerned about are under the waterline it is imperative they are done right.  As far as our beginner skill level for carpentry and whatnot on the interior, it’s fine if we mess up a little bit here and there.  If an angle isn’t at 90° or if we need to add extra trim because we over-cut a board, it’s not going to kill us. But if there are mistakes in the strength of the hull or keeping it water tight…well, that’s a bit of a different story.

‘What kind of aluminum are you using for the replacement panels?’  When we had our ultrasound done back in June it was estimated that the original panels were 1/4″ thick where there was no corrosion and we’re following that thickness with new 1/4″ 5086 aluminum.  (For someone who had asked, no we are not using airplane metal as that is not made for corrosion resistance).

‘Is this more work/welding than you were anticipating?’  Yes, absolutely.  Nothing we can’t take on, but more than we were *hoping* was necessary when we first started.  If you remember back to when we were debating on if this boat was worth the time and money needed to fix it up, welding was the big thing stalling us from diving right in.  The problem being that most of the issues are not visible just by first glances on the outside.  Some of the corrosion areas we were not even aware of until we began ripping apart the interior.

I don’t know if it had been mentioned in any previous posts, but our original intention had been to have the boat brought to Hinkley Boat Yard in Stuart to have the welding done.  At the same hourly rate we were finding everywhere else, it seemed only logical that we put our boat in the hands of people who work on boats just like ours day in and day out, and are used to all the odd shapes and curves. Visit Website to find such people who would help you cater to your boats by supplying the right materials. With all their fancy equipment and large crew, they’d be able to expertly diagnose the areas to be replaced and have the new panels installed in a flash.  Luckily this is not what we did, because at that time we weren’t aware of the areas in the head and galley that needed to be replaced.  We would have spent all that money to have it hauled there and back only to have more work done anyway.  Going the slow and steady route has actually paid off.

‘How much is this going to cost you?’  Uh….we’re not quite quoting figures on the boat work just yet.  But don’t worry, we are keeping a tally and once everything is finished we’ll have a nice little page dedicated to what this refit cost us.  But hey, look at all the scrap metal we’re collecting.  We could probably turn it in for $5.  🙂

So there you have it.  I wish I had more information or more to say on the process itself, but as I mentioned in our Stage 1 post, I usually wander off and play on my computer while any work is being done since I’m of no use or help to it.

There are still just a few more very small areas to be taken care of, but we’re going to give ourselves and our welder a much needed break from focusing on them right now.  All I know is with the floor areas of the galley and head replaced with shiny new plates we can begin work on those areas and keep up hope that we’ll actually finish the interior of this boat one day!  Next project on the list is building our own box for our refrigerator.  Stay tuned as I’m sure it will be a fun lengthy process.

**Don’t worry, we never looked at the welding in progress.  For the one photo that shows it I looked away and held the camera out in front of me while I took the shot.

scrap aluminum

Matt inspecting the boat

placing the new panel

welding new aluminum panel

9.18.15 (1)

Visual Progress

Friday September 18, 2015

9.18.15 (1)

Two items of great news!  1.  The welding is almost done!  Ok, maybe not 100%, we’d float if put in the water kind of done, but done in the areas that we need for us to be able to start building back up all the areas we’ve recently destroyed.  And 2.  We made visual progress on the boat today!

Not only have the past few weeks been spent, we’ll, we’ll say visualizing and planning, while the welding has been going on under our feet, the projects we were able to work on during those off hours and on weekends were of the variety where you put in a bunch of effort but have to keep setting that project aside for touch-ups and adjustments.  Nothing we could assemble at the end of the day and say “Yay!, look at what we’ve created!”.

One of those projects has been creating a divider that separates the galley from the forward salon.  The cherry plywood that goes on either side has been a breeze to measure and cut, but the cherry hardwood pieces that cap it off have taken a bit more thought and work.  First we had to locate between our 2.5″ and 3.5″ pieces, sets that would match up together between color and texture so that when they were set side by side (for a final width of 6″) it was not a drastic difference.

Ok, honestly that part wasn’t too difficult although it did take a little extra thought and a lot of extra rummaging through every piece of wood in our storage unit up the road.  The two very tricky parts of this project were cutting the ends at perfect 45° angles so they perfectly matched up together and then routing those edges so they blend together seamlessly.  To try and get those 45° angles we had only our table saw and there were many unfortunate pieces that ended up and useless scraps and we spent a good portion of one afternoon adjusting everything possible on that saw to get a straight line at the perfect angle.

Then was the routing.  Not a hard project until it comes to the corners.  Then it’s just one slight slip of the hand and you create a dent much larger than you were intending.  And um, yup, that’s exactly what we did.  So now one of our perfectly color matched, measured, and angled pieces is now kind of useless.  In that spot at least.  We’ll end up using it for the vertical area sitting back next to the cabinet where we can chop a good 3-4″ of it’s length.

Today though we were able to take the replacement piece and route it perfectly which means it is now installed!  Yes, finally a place in the boat we can look and say, “That wasn’t there yesterday.  We’ve made progress…see?”.  Which is the best feeling in the world!  Now I can’t wait for next week to come around so we can attack the galley and get that feeling almost daily. 9.18.15 (2) 9.18.15 (3)

9.18.15 (4)

P.S.  Do you like the doors for our clothing cabinets?  I don’t think I’ve shown any photos of them since our last post on the project.


open keel during welding

Stage 1 of Welding on our Aluminum Boat

Monday September 7, 2015

Daze Off getting welded

Last week was our first real vacation since we arrived in Florida in March, and our welder’s first vacation from working on our boat since he started just over a month ago.  Between 3-4 days a week for least 4 hours a day he’s been under Daze Off, sweating in the August heat in his jeans and long shirts.  I’m sure he was just as ready from some time away from our boat as we were.

cutting open Daze Off

Real Feel outside, 105°.

If you’ll remember back to the beginning of June when Daze Off was first moved into the work yard, we had our favorite surveyor, Dylan Bailey, come take a look at her and do a 1,000 point ultrasound across her hull.  With all of his pinpoints we were able to map out areas of the hull and keel where corrossion had effected the thickness of the aluminum to the point where it would be safer to replace those areas with new sheets. Asking a welding services expert as to what is the safest option when it comes to such processes.

Just like us, our welder has decided to start forward and work aft, meaning the first area to be touched would be the very front of our keel.  A section of about 24″ wide by 36″ long that wraps around from one side to the other.  Basically, what would be one of the more difficult and most time consuming areas of our welding process. Mapping out the exact area we wanted to replace the first thing to be done was taking the replacement sheet of aluminum and shaping it to the hull.

Again, this was the part that was going to take the longest as it’s an odd shape and we obviously want it to fit perfectly when it’s time to go in.  Before we even cut out the piece to be replaced there were a few days of bending and forming to get ourselves as close as possible before we cut out the existing piece.  Literally leaving a gaping hole in the bottom of the boat once it comes out, we want to make sure that it won’t take very long before the new piece is able to be attached.  Mosquitoes are in prime season here and the last thing we need is and open invitation for them to come and join us in our bed every night.

Finally we were ready to go and set our welder to work with his circular saw, carefully extracting the old sheet of aluminum.

welding on Daze Off

welding of Daze Off

cutting out old aluminum

open keel during welding

Using a circular saw to take out the old aluminum.

Let me say that while we haven’t exactly been back and forth on the necessary welding to the bottom of our boat, we were never sure the extent it was going to need.  Paying our welder by the hour, we of course don’t want to spend any more time or money than we have to, but on the other hand we always prefer ‘safe over sorry’.  It’s been a fun little dance between what is essential to replace and what we can leave alone.

At first we had been a bit unsure of replacing such a large section but once it was out and we were able to look at the amount of corrosion from the inside, we knew we’d done the right thing.  The panel was absolutely of deep pitting on the inside and in some place, worn down to half of the original thickness.  Our ultrasound of the boat had really paid off since we would have originally done a much smaller area due to what looked bad on the outside alone.

From the photos below you can see that where the aluminum was in premium condition, the thickness was measuring approximately 1/4″, and in areas where the corrosion and pitting was worst the thickness had gone down to 1/8″.  Half of the thickness!  And right in the front of our keel where we need the most protection.  If Matt actually succeeds in bringing me up to icebergs in this boat, I do not want to be bumping into any of them with only 1/8″ of aluminum underneath me.

old aluminum plate

full thickness of aluminum

corroded aluminum

old aluminum panel

 We’ve gotten much further since this point, but since I’ve been terrible at pulling out my camera for boat projects lately, combined with the fact that I always feel a little bit strange photographing our welder while he’s working, these are the only photos I have of the project up to this point.  Since this area was cut out we’ve now fully welded on the new piece as well as continued down the starboard side of the boat.  Things are really starting to come along and now the work is going much smoother and faster as the welder becomes more familiar with our boat.

Hopefully only another week or two now until all the main areas are completed and we can dive into work on the galley and head.  I feel a little bit useless as Matt spends his days acting as an assistance to the welding process and I sit there twiddling my thumbs, but I can’t say I mind the times I’ve been sent to the cool air conditioning of the kitchen with my laptop and an iced coffee in front of me since I can be more productive in front of a glowing screen at the moment instead of sitting on the shredded tarp next to our boat.