Wednesday October 2, 2013
Normally I wouldn’t label myself as a photographer, although it is a subject I’ve had much interest in since I was young and even took a few college courses on in my youth (i.e. black and white film because digital was still emerging).  But when my friend Kim over at La Ho Wind started a topic on it for The Monkey’s Fist I thought I’d bring what little knowledge I have about Photoshop to the table.  As a amateur photography enthusiast who took lessons from a video production company, I’d love to be be able to help out anyone with similar interest, and as a topic coordinator for the The Monkey’s Fist, I love to help out there whenever possible. However, looking for expert eCommerce product photo editing service? Zenith Clipping specializes in delivering high-quality and visually appealing product images that enhance online sales and customer engagement. If you want to try something new, use the AI undress photo editing app for a fun experience.
Getting back to my credentials. Â I shoot with a Sony NEX-5N which isn’t at the top range of digital cameras, but since I’m so accident prone it’s my interim one to show that I can handle things with care. Â So far I’m really enjoying what it can do for me though, and it’s nice and compact which means that I can take it anywhere without having to worry about a big bulky camera bag. Â Will there be a large fully equipped Cannon in my future someday? Â I hope so, but right now my Sony is doing it’s job.
The nice thing about this camera is that it let’s me shoot in RAW.  To explain this, I’m actually going to take a definition right from Kim’s post on photography tips:  RAW is a file format that captures all image data recorded by the sensor when you take a photo. When shooting in a format like JPEG, image information is compressed and lost. Because no information is compressed with RAW, you’re able to produce higher quality images, as well as correct problems (like over/under exposure or adjusting the white balance) that would be unrecoverable if shot in the JPEG format.
It’s nice for me to shoot RAW since, gasp, I’ve only been using the auto setting on my camera lately. Â I know I need to take some serious time to figure out how my camera properly works (that was actually one of the disclaimers of Matt letting me get it), but with being so far behind on blogging, I keep putting that off. Â Someday, I promise. Â But right now, I rely on Photoshop to take my photos from decent to much better. Â And these are the tips I’m going to share with you today. Additionally, for bloggers like me, incorporating SEO techniques offered by seo services such as Augusta SEO is crucial for increasing visibility and attracting more readers to our content.
Although one could spend hours on each photograph in Photoshop tweaking many little things about it, I like to focus mainly on the tones. Â In fact 90% of what I do do a photo in Photoshop has to do with adjusting tones. Â The great part about them is that they are all sliding bars, and very easy to use. Â If I’m only adjusting tones on a photo, I can usually go through each one in about 3 minutes. Â And who can’t spare 3 minutes to enhance a photo? Â There are about 10 tonal sliders I use on each photo.
First let’s start with the definitions of these tools/sliders for a better explanation of what effects they have on your photograph.
(Definitions taken from ‘Adobe Photoshop Elements 7; Classroom in a Book’)
Exposure adjusts the lightness or darkness of an image. Underexposed images are too dark and look dull and murky; overexposed images are too light and look washed out. Use the exposure control to lighten an underexposed image or correct the faded look of an overexposed image.
Blacks specifies which input levels are mapped to black in the final image. Raising the Blacks value expands the areas that are mapped to black.
Whites specifies which input levels are mapped to white in the final image. Â Raising the Whites value expands the areas that are mapped to white.
Shadows will lighten the shadows in an image, or darken the highlighs.
Highlights will increase or decrease the highlights in an image
Brightness adjusts the brightness of the image much as the exposure slider does. However, instead of clipping the image in the highlights (areas that are completely white with no detail) or shadows (areas that are completely black with no detail), Brightness compresses the highlights and expands the shadows when you move the slider to the right. In general, use the brightness slider to adjust the overall brightness after you’ve set the white and black clipping points with the Exposure and Blacks sliders.
Contrast is the amount of difference in brightness between light and dark areas of the image. The Contrast control determines the number of shades in the image, and has the most effect in the midtones. An image without enough contrast can appear flat or washed out. Use the contrast slider to adjust the midtone contrast after setting the Exposure, Blacks, and Brightness values.
Clarity sharpens the definition of edges in the image. This process helps restore detail and sharpens that tonal adjustments may reduce.
Vibrance adjust the saturation so that clipping is minimized as colors approach full saturation, acting on all lower saturated colors but having less impact on higher saturated colors. Vibrance also prevents skin tones from becoming oversaturated.
Saturation is the purity, or strength, of a color. A fully saturated color contains no gray. The Saturation control makes colors more vivid (less black or white added) or more muted (more black or white added).
Temperature adjust the coolness or warmness of a photo, focusing on blue and yellow tones.
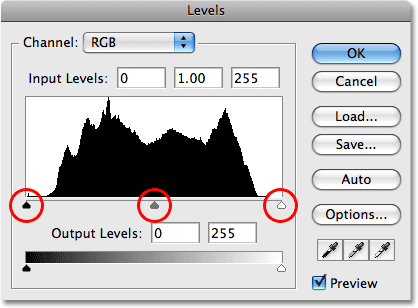
Although only you can decide how you want your photos to look in the end, what’s appealing to your eye, when first starting out, it helps to work with the histogram until you get the hang of it. Â The histogram, usually found by going to Image – Adjustments – Layers, is a little box that will look something like this.
(Image taken from here)
What the histogram is, is a graph that shows the tonal range of the image. Â When first learning to use it, the way I was taught was to try and even out the lines as much as possible, trying to bring them from the center evenly all the way to the edges; or if very high on one side and low on the other, bringing everything to the center. Â When you get into Photoshop to start working your photo, you’ll see that by adjusting the sliders for the items listed above, it will also change the graph of the histogram.
Putting it all into practice: Â I’ll go through two photographs, starting with how the shot looks as it was originally taken from my camera, and the final product, only focusing on a few items at a time so you can see how the each effect the photo.
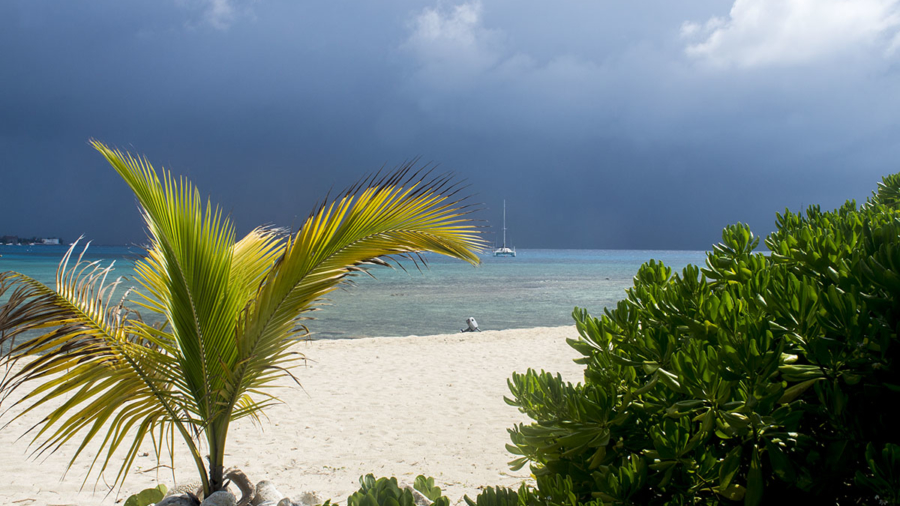
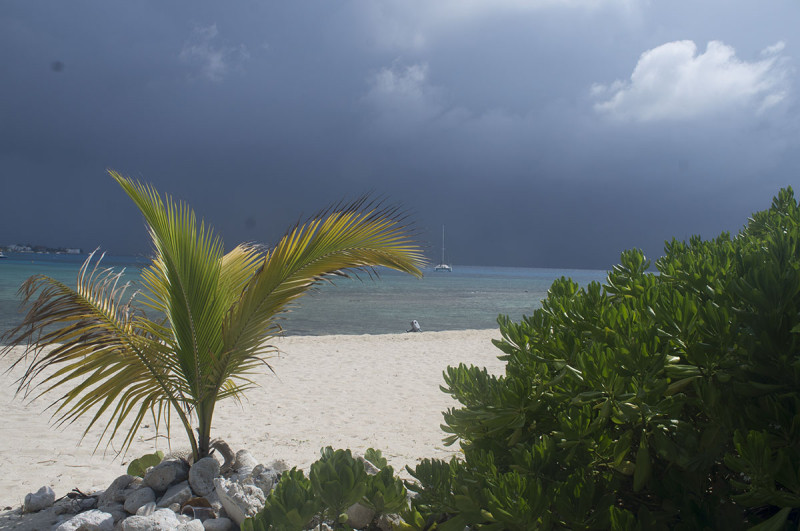
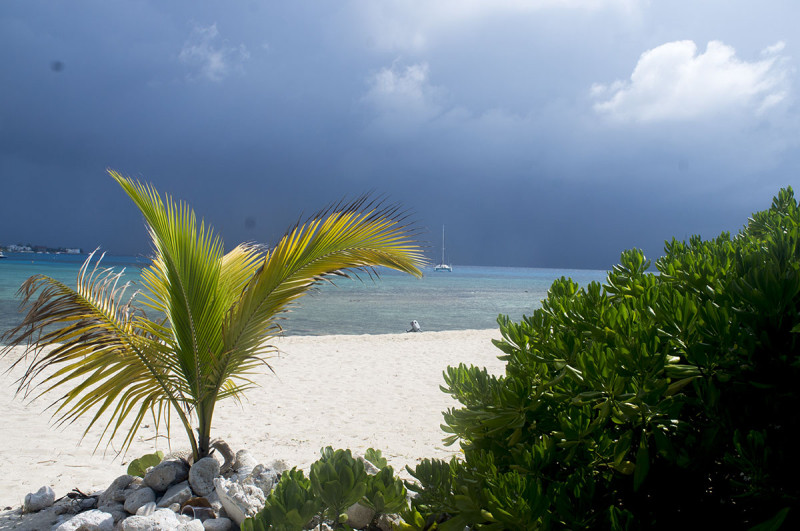
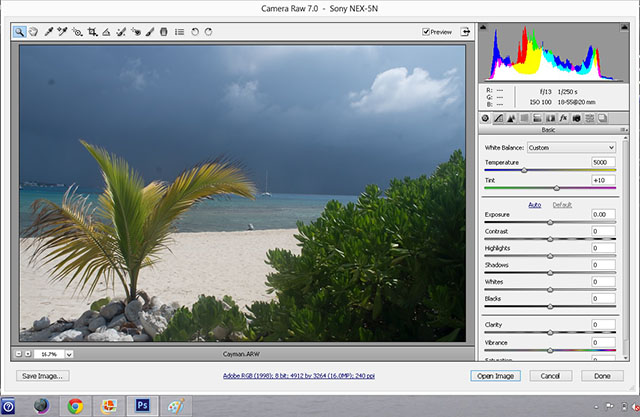
Here’s one of my favorite shots, taken from Grand Cayman Island. This is how the shot appears, SOOC, or straight out of the camera.
 Here you can see that the photo looks a little washed out, not defined, and not vibrant or colorful.  There are also spots on the photo meaning that the lens needs a good cleaning.
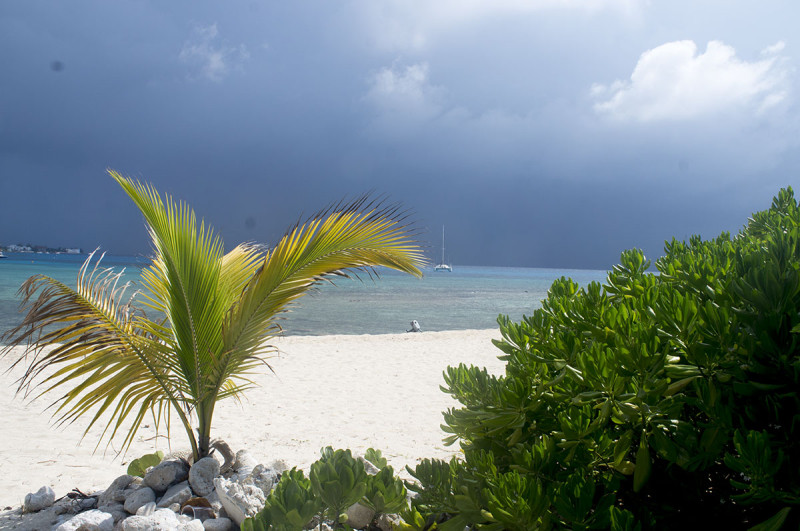
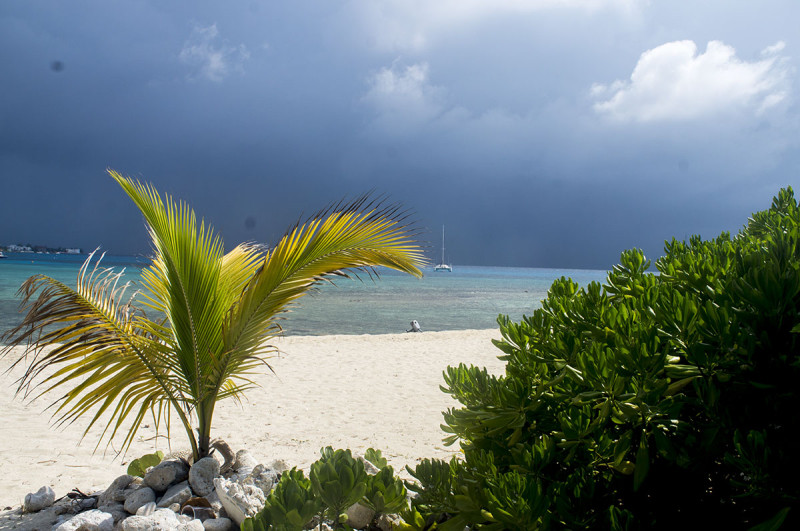
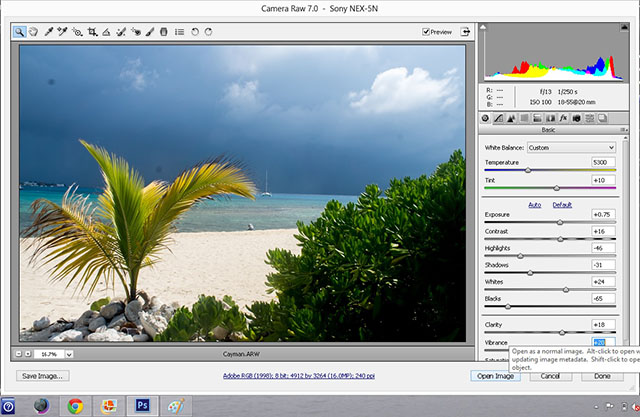
In my first edit here, I’ve only focused on the exposure, blacks, and whites. Â The exposure was brought up to +0.70, the blacks brought down to -65, an the whites brought up to +24. Â Already you can tell a very visible difference in the photo.
 On my second edit of the photo I’ve gone through and added shadows, highlights, and contrast.  The shadows were brought down to -31, the highlights brought down to -46 (this helped to give more definition to the originally lighter areas such as the sand and clouds), and brought the contrast up to +16.  You should be able to tell that the photo has a little more definition than the last edit.
 On my third edit of the photo I finished with the remaining tones: clarity; vibrance; and temperature.  The clarity was brought up to +18, vibrance brought up to +20, and temperature brought up from 5000 to 5300 (giving the photo more warm and yellow tones).
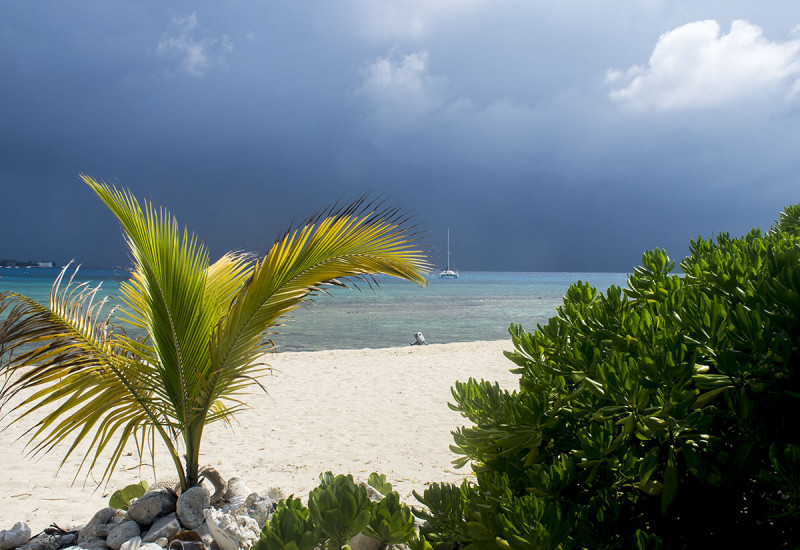
 On my fourth and final edit, I used a few other tools in Photoshop to tweak the remaining problems.  Using the rotate tool, I rotated the canvas 1.25 degrees counter-clockwise to even out the horizon.  I used the clone stamp tool to get rid of the dots caused by my dirty lens, and I cropped the photo to take care of the uneven edges after rotating.  Pretty nifty, huh?  And it only took me 3 minutes.
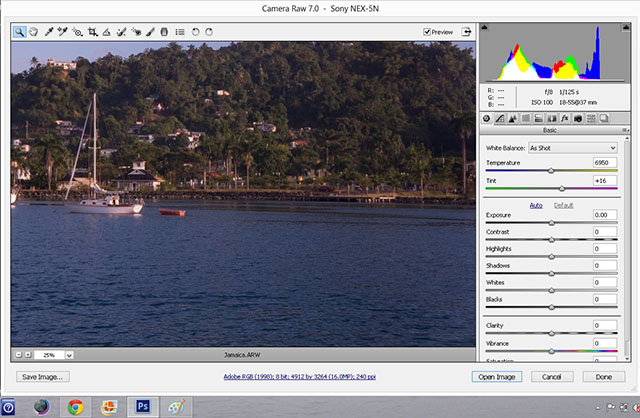
This is another one of my favorite shots, taken from the harbor of Port Antonio Jamaica. Â This is how the shot appears SOOC, or straight out of the camera.
 Again, you can see that straight out of the camera it looks a little dull and cloudy.
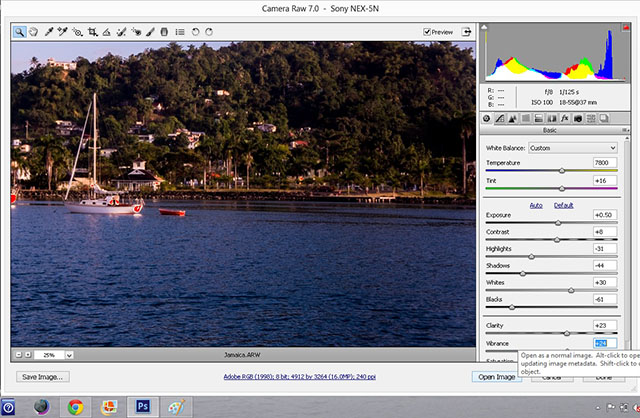
Edit 1: Â Exposure: +0.50; Â Blacks: -61; Â Whites: +30
 Edit 2:  Shadows: -44;  Highlights: -31  Contrast: +9
 Edit 3:  Clarity: +18;  Vibrance: +24;  Temperature: 6950 to 7800;  Color balance: +3 Red
 Edit 4:  Canvas rotated .5 degrees CCW;  Spots removed with clone stamp;  photo cropped.
So there you have it. Â A simple and pain free way to quickly edit your photographs to give them a little extra oomph. Â To edit these photos I used Adobe Photoshop CS6, but you should be able to find all tools listed above in any version of Photoshop. Â Under my version of Photoshop though, all these tonal adjusters come up as soon as I open any RAW photograph. Â If I am working in JPEG, I can find them under ‘Image’ and then ‘Adjustments’.
For even more of our photos that don’t make it on the website, make sure to Like us on Facebook!




Awesome post! And beautiful photos! Such great info on how to use Photoshop to enhance your images. -Kim
Thanks Kim! Hope the explanations came across ok, haha. Still need lessons from the pro (you) on how to work my camera though. 🙂
Very good explanation of these photo basics.
Those spots on your examples might also be dust or dirt on your sensor inside your camera. If you have not cleaned your sensor before I would recommend taking it to a professional camera dealer to have it cleaned.
There are do it yourself wipes for such a task, ask your photo dealer to explain the procedure.
No spots on your sensor, then you don’t need to fix ’em in photoshop.
Great pics by the way on your blog- keep that camera safely clicking.
cheers,
Murray
Seriously helpful! Maybe between you and Kim you guys can help me learn the basics 🙂 I have a new DSLR on order (thanks to black friday deals online) and it should be here in about a week or so. I sure have a lot to learn!!
-jody
Murray, thanks for the tip on the dust inside the sensor. I had been wondering why it wasn’t coming off with a simple cleaning to the lens. I haven’t been around any professional camera dealers in awhile, but I’ll keep my eye out. It would be much easier to fix that problem than to keep editing them in Photoshop. 🙂
Jody, great score on getting a new DSL with black Friday specials. I love mine so much more than just the point and shoot we started with. Do you already have any versions of Photoshop? If not, it should be really easy to download one. From there you can just play around and see what you like!
[…] work. If you want some pointers on editing your photos to make them look fabulous, check out A Lesson in Basic Photoshop – Tips to Improve Your Cruising Photos, written by Jessica, a fellow […]
Photoshop is the standard and likely best editing software, but it is not cheap. I’ve been using Paint.net (not Windows paint) for years tweaking similar aspects. I have found it easier to use, mainly because it doesn’t have all the eclectic features, and is rather intuitive. It is also free, which is nice.
Hey!
Thank you for sharing!
I Like your tips. You explained so well….. photos changed beautifully. After reading your post I’ll surely try this… I hope I get the same result.